Showing posts with label ssh. Show all posts

Friday, September 21, 2012

Editor de codigo Python (texto)

Muchas veces, debo hacer cambios, o escribir por completo un script (secuencia de comandos) Python a través de una conexión ssh. Sin X forwarding tampoco, y por eso no puedo utilizar un editor grafico.

Hay nano y vi en la distribución Raspbian Wheezy, pero, hay algo mejor: vim. En la mayoría de las distribuciones Linux y en OpenIndiana, vi es en realidad vim, pero en Raspbian, vi es vi. Vamos a ajustar eso:

fdion@raspberrypi ~ $ sudo apt-get install vim
Y tambien hay que anadir a .vimrc (en /home/user):

syntax on
filetype indent plugin on
set modeline

fdion@raspberrypi ~ $ pwd
/home/fdion
fdion@raspberrypi ~ $ ls .vimrc
.vimrc
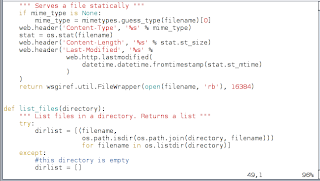
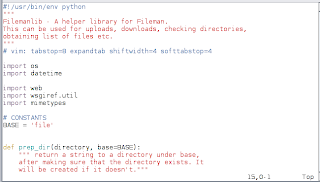
Muy bien, ahora es mas facil a leer el codigo Python en color:


vi file.py


Hay tambien que anadir una linea con instrucciones para vim:


La primera linea es siempre la "shebang":

#!/usr/bin/env python


Despues, una docstring (descripcion) del fichero entre """ y """. La septima linea (en nuestro ejemplo) es para vim:

# vim: tabstop=4 expandtab shiftwidth=4 softtabstop=4


Voy a anadir otra linea tambien, en espanol, frances y portugués, a causa de los acentos debemos poner el codigo:

# vim: set fileencoding=utf-8

Francois
@f_dion
 

Friday, September 14, 2012

Sidekick 2

Continuing on using the raspberry pi as your desktop's sidekick, we will focus today on making it easier to work with, better integrated, when your desktop is Unix (Solaris, OpenIndiana), Linux, Mac OS/X or even Windows (except you wont be able to use ssh-keygen or scp - instead check the section I Got a PC? toward the end of the post).

Automating login

First thing first, we need to create a new user on the Raspberry Pi. Although the user pi is pretty cool, you dont want to have to specify the user in all the commands you will do, so we'll match it to the username on the desktop.

Let's say your username is user on your desktop (of course, if you want to have a username billybob, then replace user with billybob in the below code). You will need to connect as the pi user, then set up a new user:


 ssh pi@raspberrypi  
 (enter your pi user password)  
 pi@raspberrypi ~ $ sudo useradd -d /home/user -s /bin/bash user   
 pi@raspberrypi ~ $ sudo mkdir /home/user  
 pi@raspberrypi ~ $ sudo chown user:pi /home/user  
 pi@raspberrypi ~ $ sudo passwd user  
 pi@raspberrypi ~ $ Enter new UNIX password:  (type password)
 pi@raspberrypi ~ $ Retype new UNIX password:  (type it again)
 pi@raspberrypi ~ $ passwd: password updated successfully  
 pi@raspberrypi ~ $ sudo cp .bashrc ../user
 pi@raspberrypi ~ $ sudo cp .profile ../user

The last item we have to do is to edit the /etc/sudoers file and add our user to it ([esc] means hit the escape key):

 pi@raspberrypi ~ $ sudo vi /etc/sudoers  
 (add the following line after going to last line and typing o)  
 user ALL=(ALL) NOPASSWD: ALL  
 [esc] :wq!
 pi@raspberrypi ~ $ exit

BTW, for most people, there is too much detail (such as how to add a line in vi), but keeping in mind that there are some people in schools reading this and they just starting playing with this, I think it is well justified).

 We now go back to our desktop and test that we can login as the user (no need to specify user@raspberrypi, just raspberrypi since the default is to user the desktop current user):

 user@desktop ~ $ ssh raspberrypi  
 (enter password)  
 user@raspberrypi ~ $ mkdir .ssh  
 user@raspberrypi ~ $ exit  

Now, we will generate an RSA private and public key pair. We will then copy the public key to the RPi as authorized_keys2 under the .ssh folder:

 user@desktop ~ $ ssh-keygen -t rsa  
 (enter to accept the defaults)  
 user@desktop ~ $ cd .ssh  
 user@desktop ~ $ scp id_rsa.pub raspberrypi:.ssh/authorized_keys2  
 (enter password)  

We will login once more on the RPi to change access:

 user@desktop ~ $ ssh raspberrypi  
 (enter password)  
 user@raspberrypi ~ $ cd .ssh  
 user@raspberrypi ~ $ chmod go-r authorized_keys2  
 user@raspberrypi ~ $ exit  

At last, we can now copy files using scp or login on our RPi without entering a password:

 user@desktop ~ $ ssh raspberrypi  
 user@raspberrypi ~ $  

Yeah!

SCP tasks

Getting a file

To get a file from the RPi, onto the desktop:

The file is in the /home/user directory:
user@desktop ~ $ scp raspberry:file.txt .
 
The file is in /home/user/directory:
user@desktop ~ $ scp raspberry:directory/file.txt .
 
The file is in /home/user/directory/subdirectory:
user@desktop ~ $ scp raspberry:/home/user/directory/subdirectory/file .

Putting a file

To get a file from the RPi, onto the desktop:

The file is in the /home/user directory:
user@desktop ~ $ scp raspberry:file.txt .
 
The file is in /home/user/directory:
user@desktop ~ $ scp raspberry:directory/file.txt .
 
The file is in /home/user/directory/subdirectory:
user@desktop ~ $ scp raspberry:/home/user/directory/subdirectory/file .

Action on a directory

To get or put a directory, simply use the -r flag:

user@desktop ~ $ scp -r mydir raspberry:
 
This will copy recursively mydir onto the server named raspberry, into the default home directory. There is a lot more flexibility to scp, so read up on it:

user@desktop ~ $ man scp

GUI access

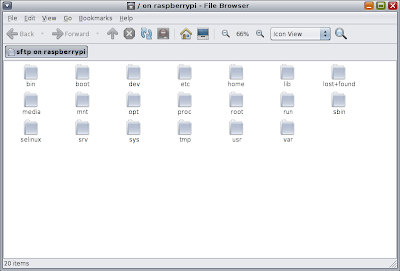
I use OpenIndiana as a desktop, most of the time, and that OS, and most Linux versions, has a tool to connect to a server using various protocols and provide a GUI. In the case of OpenIndiana, it is the gnome tool that can be found in the menu as item "connect to server":


This will then open a Nautilus file browser:

Other Options

Another option under unix/linux to access files remotely is through sshfs, a FUSE module. It allows to mount an ssh (sftp) remote system as a local filesystem. If you need this, you are probably already know how to use it, so I wont get into details.

I got a mac?

There is no GUI option directly, Basically, using the technique above with FUSE, I've done it on my Mac using FUSE at http://osxfuse.github.com/, then I downloaded Macfusion.


If anybody wants a more detailed instruction, leave a comment. I dont want to spend too much time on this if no reader is using a raspberry pi as a sidekick to a Mac.

I got a PC?

To automatically login without password, you will need putty (see the previous blog entry on this) and also puttygen. But at the end of the day, why bother? 

The OS doesn't leverage this. Instead, get a GUI interface like Winscp to copy files back and forth.


I use winscp all the time with Windows 7, and you can save configurations, including passwords, so this is fairly painless.
Tuesday, September 11, 2012

Sidekick

So, Batman has Robin, Sherlock Holmes has Dr John Watson, Sheriff Andy Taylor has Deputy Barney Fife... Well, you get the idea: All heroes have a sidekick (if not, they are missing out).

You need a sidekick

Or at least, your desktop does.

If your desktop is a Raspberry Pi, then you already know the life of a sidekick well, or at least you are learning it. This article is not really for you, although it might come in handy later. So, for all you Raspberry Pi owners who do everything on the Raspberry Pi, stay tuned to this blog for a future post: The Sidekick's Sidekick.

Unix, Linux or Mac Desktop

This will be smooth sailing. Open a terminal and type:
 $ ssh -X pi@raspberrypi  
 pi@raspberrypi's password:   
 Linux raspberrypi 3.1.9+ #168 PREEMPT Sat Jul 14 18:56:31 BST 2012 armv6l  
 The programs included with the Debian GNU/Linux system are free software;  
 the exact distribution terms for each program are described in the  
 individual files in /usr/share/doc/*/copyright.  
 Debian GNU/Linux comes with ABSOLUTELY NO WARRANTY, to the extent  
 permitted by applicable law.  
 Type 'startx' to launch a graphical session  
 Last login: Tue Sep 11 15:32:33 2012 from v480-sunray  
 pi@raspberrypi ~ $   
The first time you will be asked to accept the host key, say yes. Enter your password when prompted. If you entered the correct password, you are in.

Windows (XP, 7, ...)

Ok, this is a little more involved.
  1. Download Putty
  2. Enter the following information in the configuration:
  • Hostname: raspberrypi
  • go to the ssh tab and click X11 forwarding
  • Entere for Saved Session: raspberrypi
  • click Save

I'm not going to go through all the details here. Simply to say that you need to go to the ssh tab and click X11 forwarding download Xming server which will add an X server to Windows. You then need to start the Xming server from the start menu, then open the session in Putty. For more detail, go here
  • Double click on raspberrypi (or select and click open)
You will be asked to accept the host key, say yes. Enter your userid (pi) and password when prompted. If you entered the correct password, you are in.
With that setup however, you only get a fraction of the functionality of what we did for Unix, Linux or Mac.

What are we doing again?

You can now run any console application directly in that window, but even more interesting is the fact that you can run a graphical application on your Raspberry Pi, but the graphical display itself will be on your desktop.

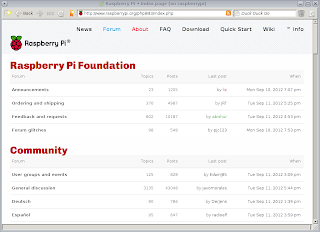
Look, Ma, no VNC! For example, you want to run the midori browser. In the ssh window, at the prompt, type: midori
 $ pi@raspberrypi ~ $ midori
And you should get:
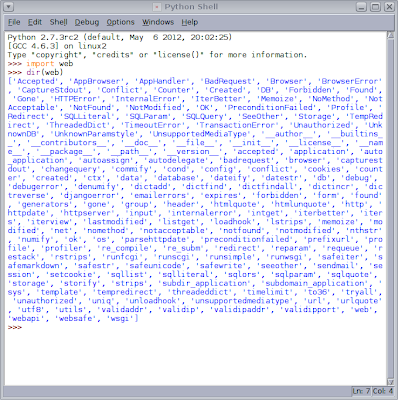
Or perhaps you want to write some Python code. After all, this is a Python centric blog...
 $ pi@raspberrypi ~ $ idle
And you should get:
Now, remember, although the idle window is on my desktop, when I type import web, it is importing a library on the Raspberry Pi, and not from my desktop. By default, web.py is not installed by default.

To install:

pi@raspberrypi ~/Desktop $ sudo easy_install web.py
Searching for web.py
Best match: web.py 0.37
Processing web.py-0.37-py2.7.egg
web.py 0.37 is already the active version in easy-install.pth

Using /usr/local/lib/python2.7/dist-packages/web.py-0.37-py2.7.egg
Processing dependencies for web.py
Finished processing dependencies for web.py

In the above example, it actually didn't download the library, because I had installed it already. In fact, one of the first thing I did. Web.py is like duct tape for web applications. Or Web services. Or template driven apps. Or scripts that need database access. I could go on. Although a web framework, each module can be used individually, or can be replaced, or used alongside similar modules. On the screenshot, I did a dir(web) to show what modules are available. If there is some interest, I'll do a tutorial on using web.py, just let me know in the comments.

Concluding on this way of working, I could be editing python code in idle, while viewing the result of my web application in a web browser (either locally through midori or remotely using my desktop's browser). But that, is just touching the tip of the iceberg. There will be more to come in the coming weeks.

[Edit:]
Part 2