Media Library for developers
Last updated: May-25-2025
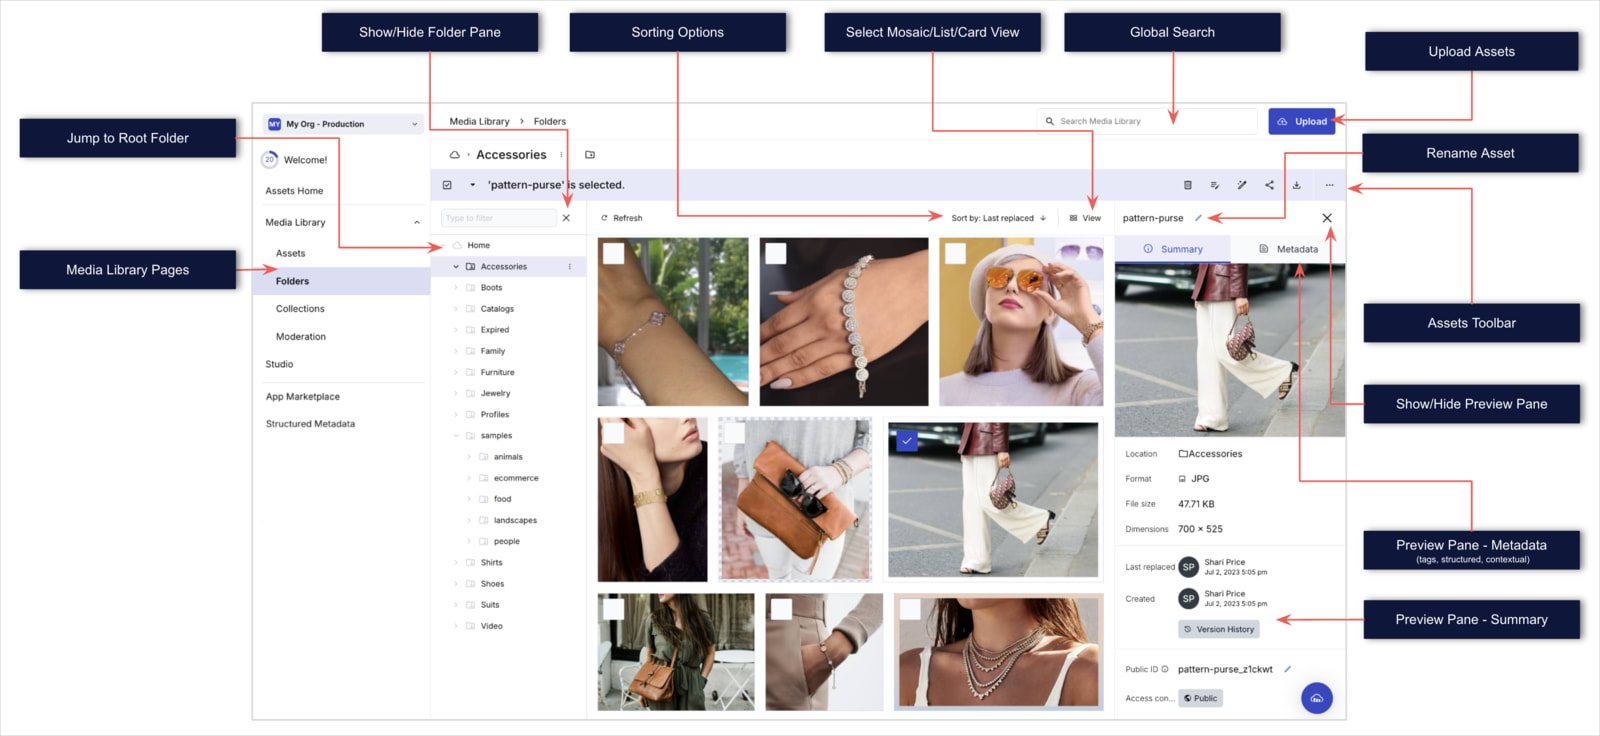
The Media Library is a user interface in the Cloudinary Console that enables you to view, search, upload, and manage all the assets in your product environment.
While the Media Library in the Console is primarily designed as a Digital Asset Management tool for creative teams to prepare and manually manage assets, it can also be a valuable time-saving and debugging tool for developers. After running code that uploads or modifies assets, like applying an upload preset, setting metadata, or moving assets between folders, you can use the Media Library to visually confirm that everything worked as expected. It's a quick way to check if your asset landed in the right folder, if the correct tags or structured metadata were applied, or if the expected transformations took effect, without needing to call the Admin API.
The Media Library is available from the Assets product in the Console, but you can quickly jump to it from the Media Library node in the Image (or Programmable Media) or Video product navigation menus.
If you have an Assets Enterprise plan, see the Assets guides to learn about the full set of features available to you.
Media Library developer features
From the Media Library, you can:
- Navigate between different pages:
- Assets: A flat view of all assets, sortable by various options. Includes search capabilities with a wide range of filters and other options.
- Folders: A hierarchical view of assets organized by folders. Opens at the root folder by default.
- Collections: A dynamic way to create conceptual groupings of assets for DAM use cases.
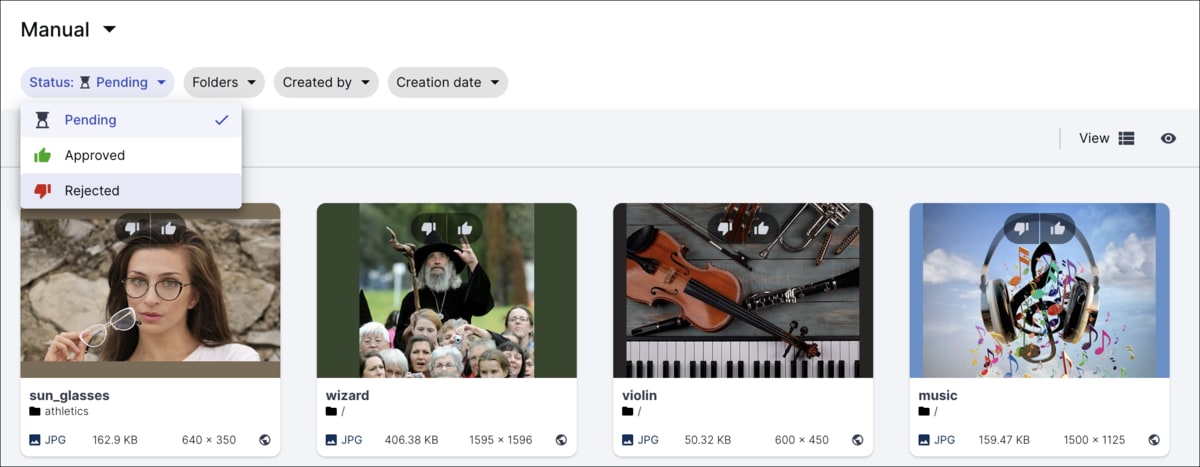
- Moderation: A manual review interface for rejecting assets that don’t meet standards.
- Upload new images, videos, audio, or other file types.
- Switch between different views optimized for various management tasks.
- Open the preview pane manage asset-level information.
- Select multiple assets to perform bulk actions like delete, move, or download.
Uploading assets
You'll likely want to upload programmatically if your end-user website supports user-generated content, if you want to enable third parties who aren't users in your account (such as photographers) to upload images and videos to Cloudinary, or if you’re migrating assets from another source.
But if you're developing a frontend-only app without user-generated content, experimenting, or otherwise don't have a need for programmatic uploads, the easiest way to add assets to Cloudinary is through the Media Library interface.
Drag and drop
Easily drag and drop a single asset, multiple assets, or an entire folder structure into the Media Library. The upload process preserves the original folder hierarchy.
By default, drag-and-drop uploads use the Media Library Upload Preset Defaults, which admins set in the Upload Defaults tab under Upload in the Console Settings. Admins can choose defaults that differ from the API upload presets and can assign separate presets for images, videos, and raw files. These settings determine how the system handles assets during upload, including transformations, access control, and more.
To override the default preset for a specific upload, users can open the Upload Widget, choose a different preset, and then drag and drop their files or folder structure into the widget.
Upload Widget
The Upload Widget is useful when you want to upload assets using a specific upload preset and/or manually configure additional options—such as applying a tag to all uploaded assets. It’s also handy for testing new upload presets to ensure they behave as expected before using them in production code.
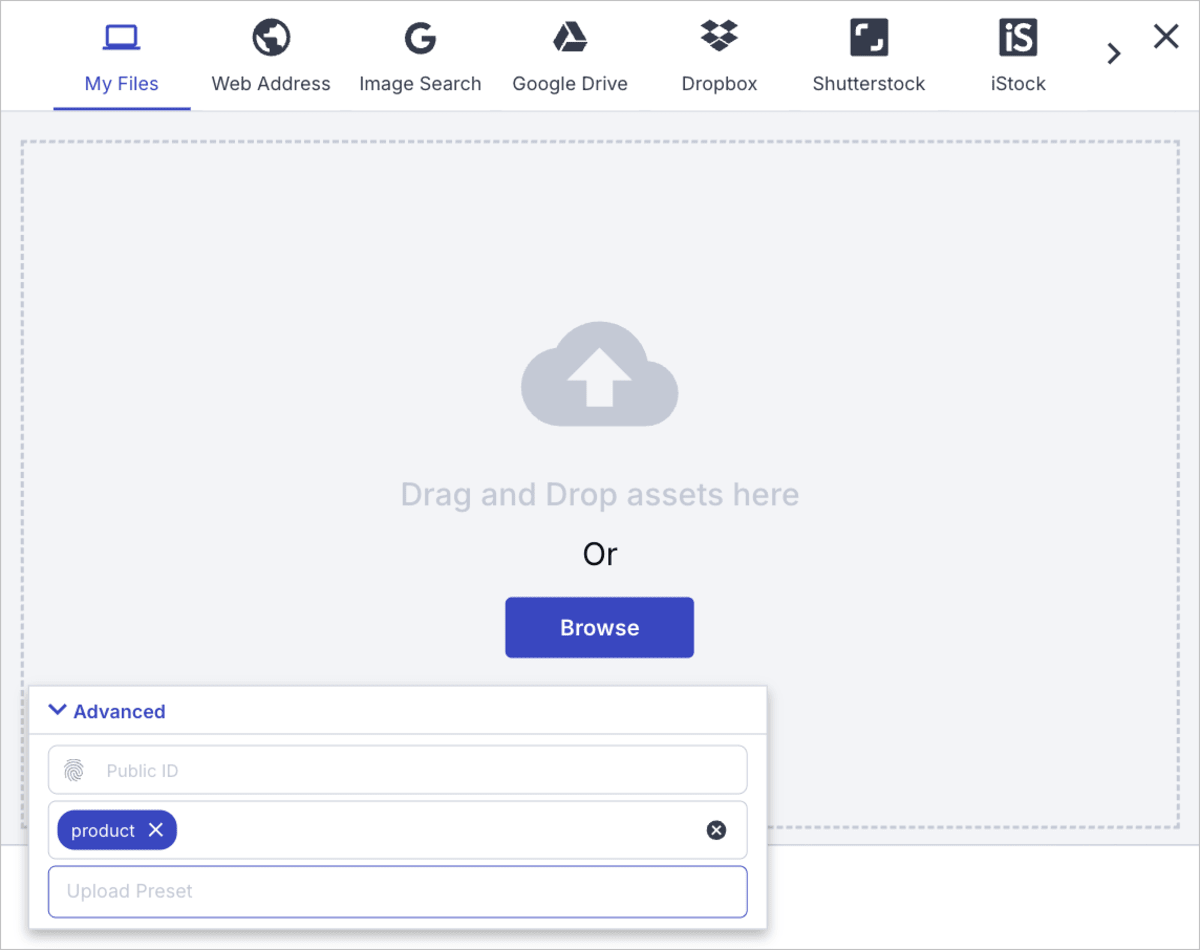
Click Upload at the top-right of the Media Library to open the Upload Widget. In the Advanced section, you can:
- Set a public ID for the uploaded assets. If uploading multiple files, each one gets the specified public ID plus a counter suffix.
- Apply tags to all uploaded assets.
- Select a signed upload preset that you want to apply to all assets you upload in that specific upload widget session.
- You must configure Advanced options before selecting files to upload.
- By default, the Upload Preset option is hidden. To enable it for your product environment, support request.
- Depending on your setup, you may be prompted to select an upload preset during every Media Library Upload Widget upload session. If you have only one upload preset configured in your product environment, this step is skipped.
Replace
You can manually replace an asset from the Media Library, for example, during hands-on debugging, content validation, or one-off fixes.
To replace an asset, open its context menu and select Replace. This opens the Upload Widget. The asset you upload overwrites the selected asset while preserving its public ID and URL.
- This action is only accessible to users with Can edit permissions or higher for the asset. Moreover, it's restricted to assets with the
uploaddelivery type and is unavailable for authenticated, private, etc. delivery types. - If you've replaced an asset and want to revert to a previous version, see Version history.
Viewing assets
The Media Library provides multiple ways to browse and work with your assets, whether you’re scanning visually or filtering by metadata.
All views allow you to copy the asset's delivery URL and access the context menu containing many useful actions such as download, rename, and replace.
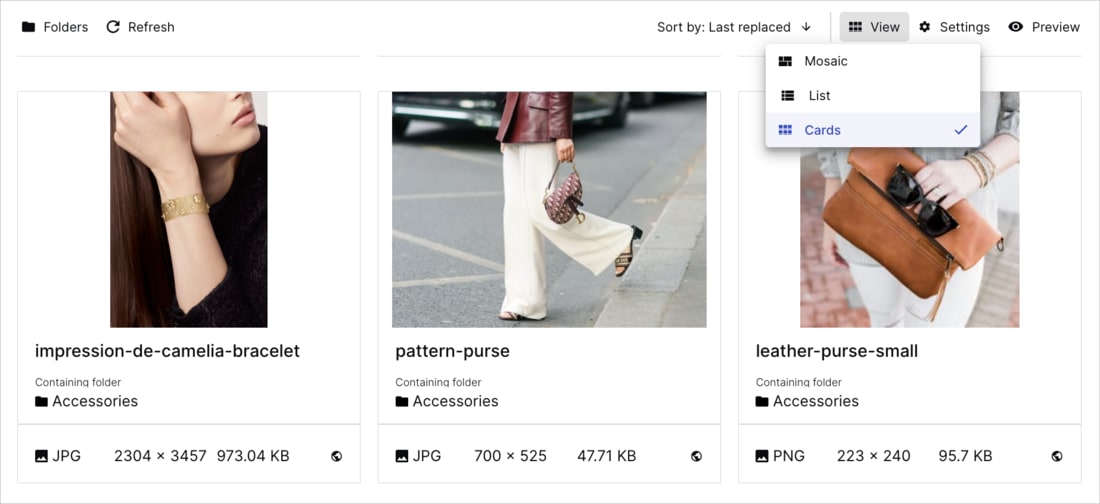
Choose the view that best supports your current task. All views are available from the Assets, Folders, and Moderation pages, except Mosaic view, which is available only in Assets and Folders.
List view
List view displays your assets in a table format, giving you a high-level overview and making it easy to scan, compare, and view asset metadata at a glance.
Sort assets by clicking any sortable column header to toggle between ascending and descending order.
Card view
Card view displays assets as a grid of cards, useful when you want a visual scan with light metadata.
Mosaic view
Mosaic view displays assets in a responsive masonry-style layout, ideal for visually scanning many assets at once.
Besides the display name (the public ID in the legacy fixed folder mode), this view doesn't display additional metadata on the assets.
Common viewing actions
Key developer-oriented options available via the asset context menu are:
Copy URL: Copies the asset's full delivery URL, including the version number. Useful if you frequently need asset URLs for testing or to use in code.
Copy URL without version: Copies the asset's URL without the version identifier. This ensures the URL always points to the latest version. Helpful for development environments or dynamic references.
Open in a new tab: Opens the asset in a new browser tab, making it easy to test URL-based transformations or inspect delivery behavior.
- Copy URL is an option in the asset context menu.
- Copy URL without version and Open in a new tab are available from the dialog that opens when you select Share → Embed from the asset context menu.
- Open in a new tab is also available by clicking the asset thumbnail in the Summary tab of the preview pane (select a single asset and click Preview).
Managing assets
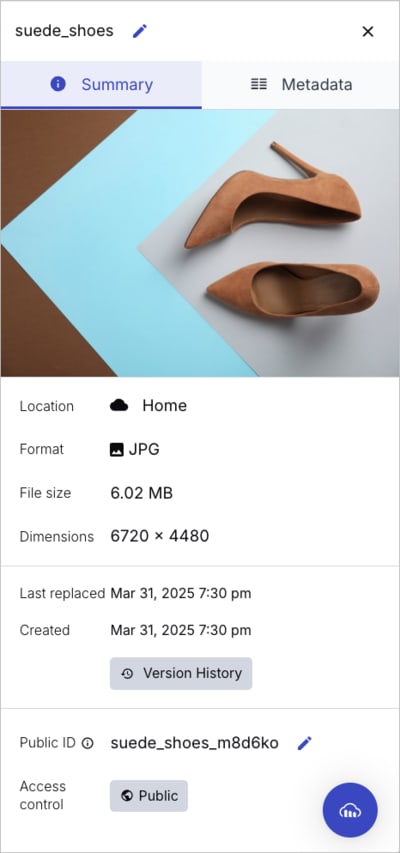
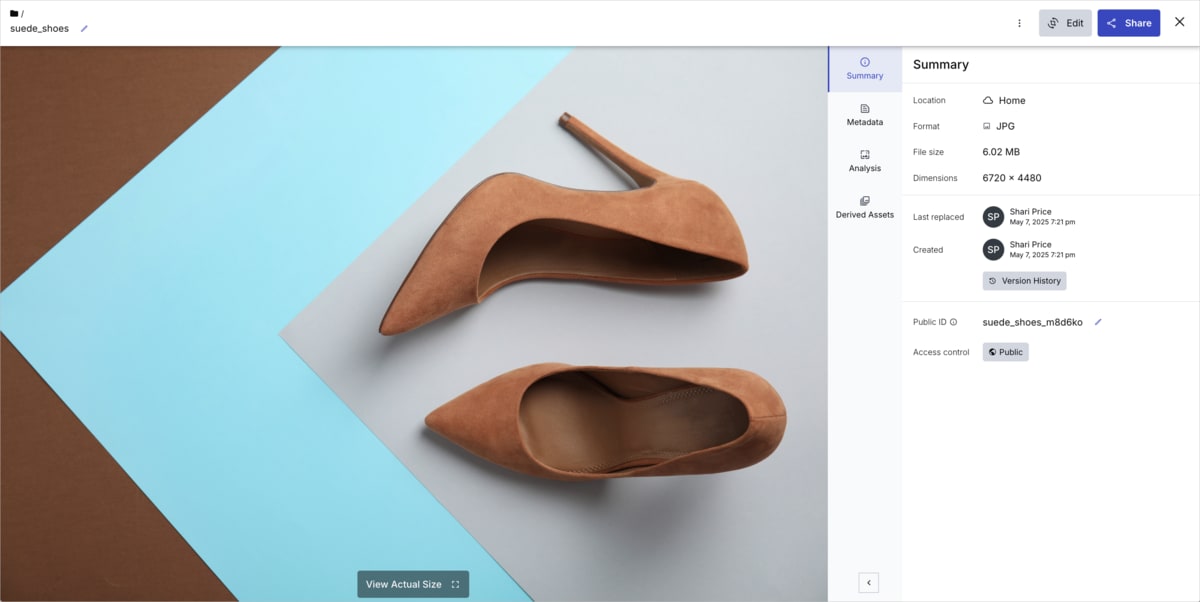
When you need to inspect or manage an individual asset, use the preview pane. Select an asset and click the Preview icon to open it.
You can also view asset details from the asset Manage page. Double click the asset. The Summary tab opens by default.
Asset identifiers
You can view and edit asset identifiers:
Public ID: Shown in the Summary tab of the preview pane. View, copy, or edit the public ID used in delivery URLs.
Display name: Shown at the top of the preview pane, the display name is a human-readable label that can help organize assets, especially when browsing or searching in the Media Library. (Available in dynamic folder mode only.)
Quick delivery testing
To test delivery behavior and transformations, click the asset thumbnail in the Summary tab to open the asset delivery URL it in a new browser tab. (You can also do this from asset views. See Common viewing actions.)
Tags, contextual metadata, and structured metadata values
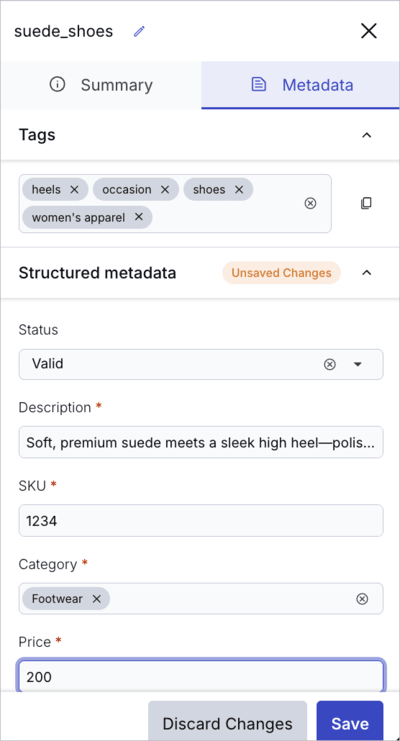
In the Metadata tab of the preview pane, you can:
View and edit tags.
View and edit contextual metadata values.
View and edit structured metadata values.
You can also edit tags, contextual metadata, and structured metadata for multiple assets at a time. Select the assets you want to update, click the Metadata icon in the assets toolbar, and select the metadata type you want to update.
Managing structured metadata fields
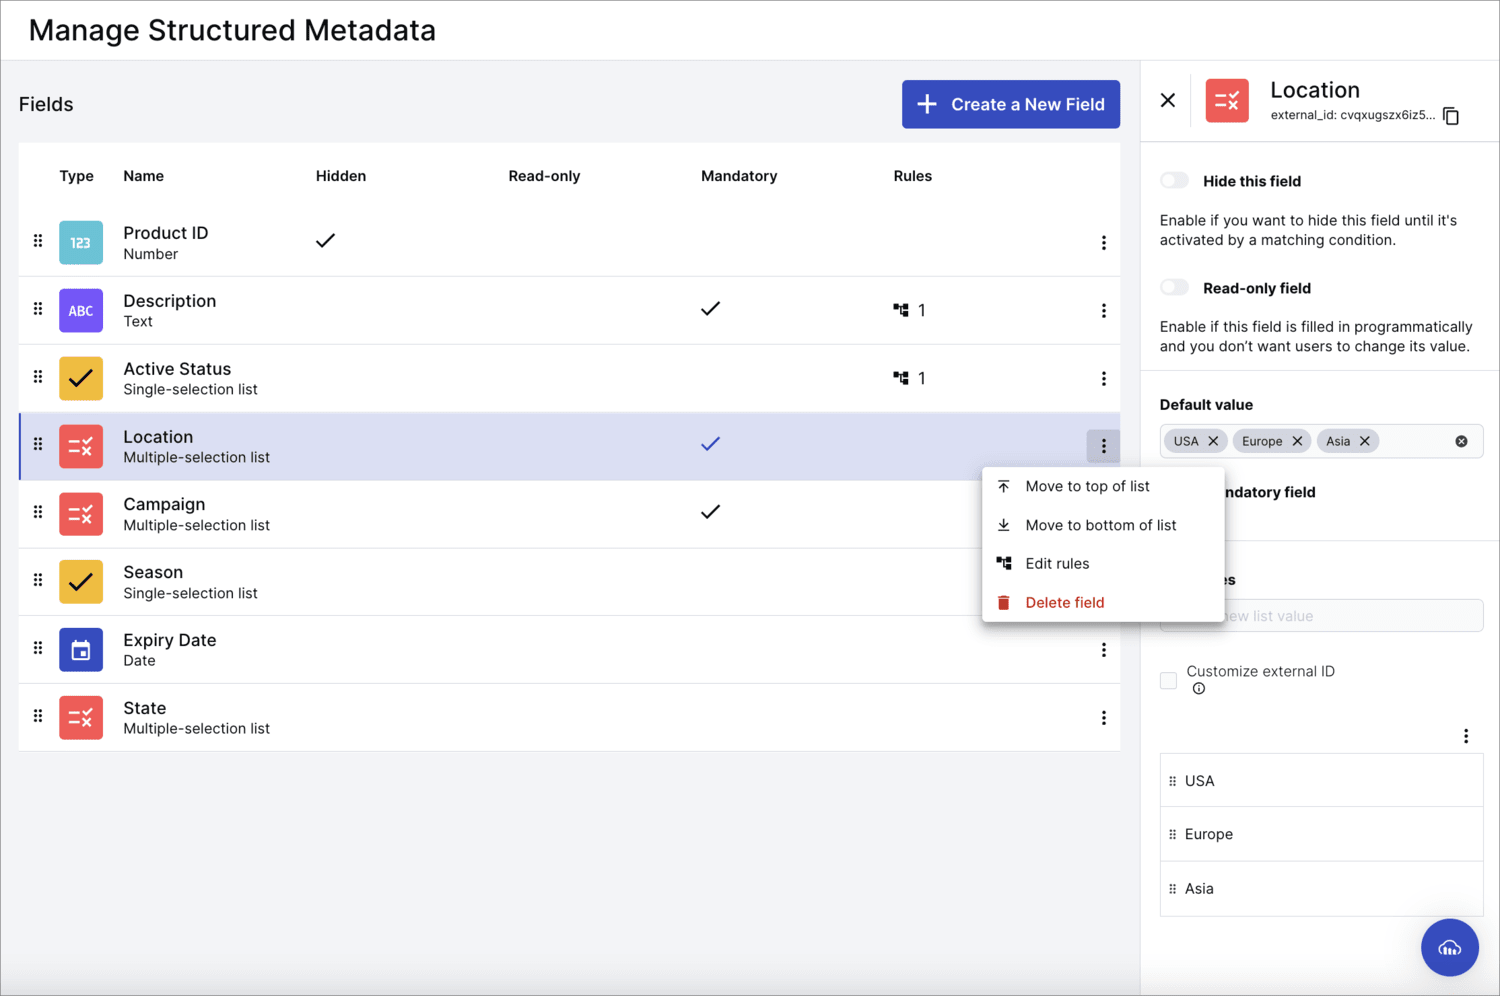
The Structured metadata page lets you define and manage up to 10 metadata fields that appear in the Media Library for your product environment. These fields help you organize and filter assets by custom attributes like Status, Team, or Project.
From this page, you can:
Create structured metadata fields using common input types, including text, numeric, date, and single- or multi-select options.
Edit field settings such as labels, default values, and whether a field is required.
Delete fields you no longer need.
Access control
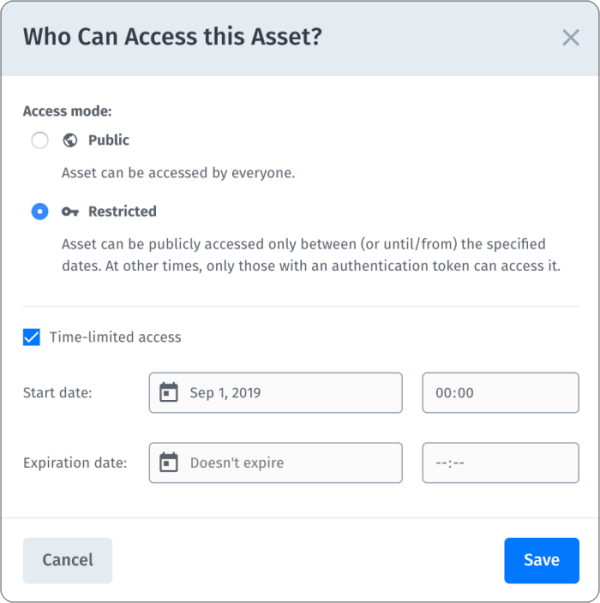
From the Summary tab, you can set access control for individual assets, which is the same as setting the access_control option programmatically via the API.
Setting an asset to Restricted requires token based access to access the asset. You can set a date range when the asset is publicly available:
Version history
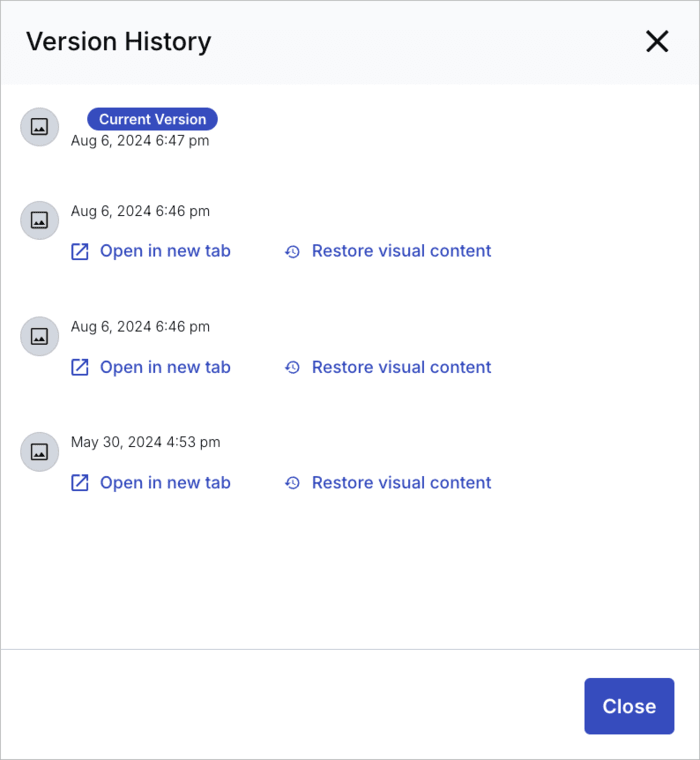
Version history lets you preview and restore earlier versions of an asset—helpful for debugging, comparing changes over time, or rolling back an asset during development or staging.
From the Summary tab of the preview pane, click Version History to:
List previously uploaded versions.
Preview any version by clicking Open in new tab.
Restore a version by clicking Restore visual content next to it.
Asset analysis (images only)
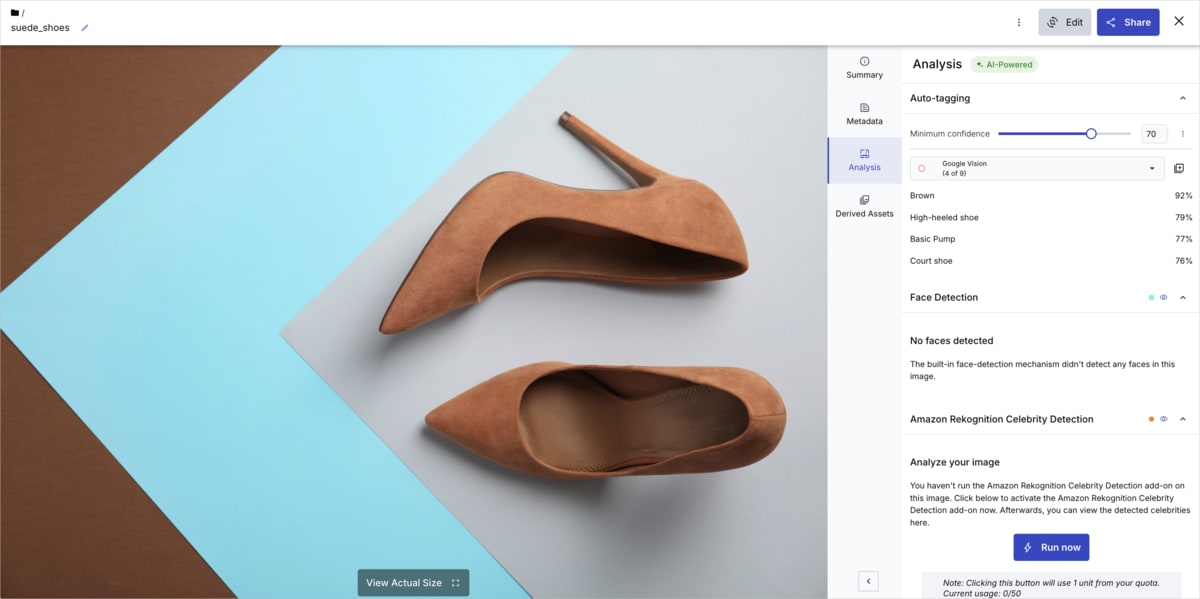
The Analysis tab of the asset Manage page lets you view AI-generated data for an image automatically collected or triggered via add-ons. It’s a quick way to debug transformations, confirm face or text detection, and explore tagging or color data without writing code.
Double-click an asset and select the Analysis tab:
Available analyses
Auto-tagging: Returns category suggestions with confidence scores. Apply as tags or use to validate AI tagging setup.
Face & Celebrity Detection: Detects faces and (if enabled) celebrities. View coordinates, adjust bounding boxes, and use for face-aware transformations.
Area of Interest: Set a focal point to control cropping and overlays.
OCR: Detects and highlights text. Useful for redaction, cropping, or extracting phrases via API.
Color Analysis: Lists dominant colors for UI theming, search, or transformation logic.
Derived assets
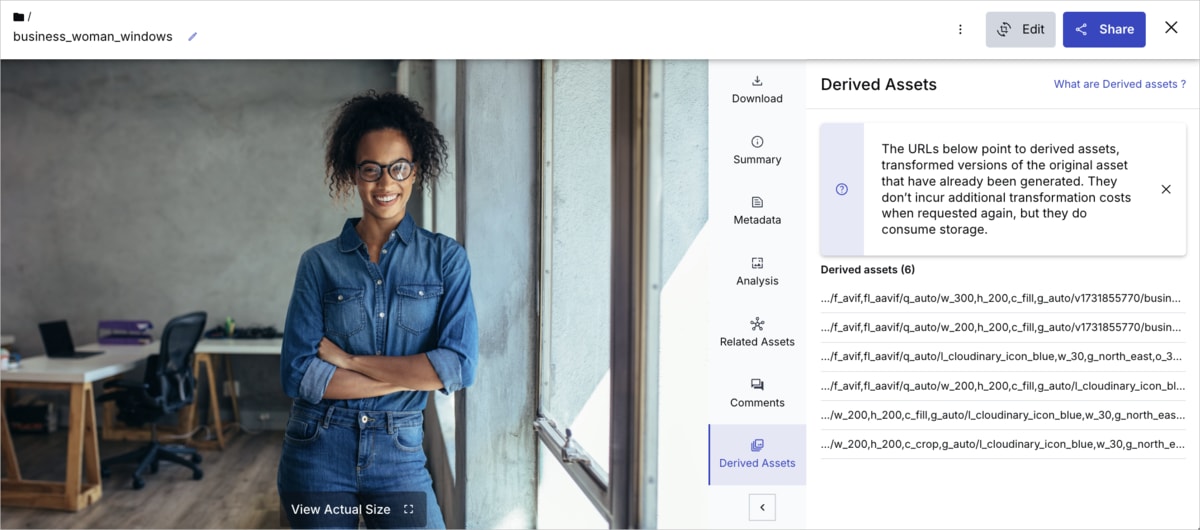
A transformation generates a derived asset when you apply it programmatically using an eager transformation, when a website or app renders the transformation for the first time, or when someone first opens its URL in a browser. Once generated, a derived asset can be delivered again without incurring transformation costs. However, derived assets do consume storage. For more details, see How are transformations counted.
View an asset’s derived assets to manage storage or reuse a previously generated transformation in your code. To do this, double-click the asset to open its Manage page, then select the Derived Assets tab.
Folders
Use the Media Library to confirm that assets uploaded programmatically were placed in the correct folder using the asset_folder parameter. This is useful for validating upload logic, presets, or conditional folder assignments.
For more information on setting folders during upload, see the optional parameters of the upload endpoint.
Check folder placement from the Folders page to verify assets are organized as expected.
Use List view to scan multiple assets across folders and check folder paths alongside metadata.
To fix test uploads or reorganize assets, select one or more assets and choose Move to Folder from the assets toolbar.
Download
You can download the original asset as it was uploaded, useful for verifying that the correct file was uploaded, or using the original in local testing.
You can download a single asset from the context menu, or download multiple assets as a ZIP file by selecting them and clicking the Download icon in the toolbar.
You can also download Media Library asset folders.
Studios
The Image and Video Player Studios in Cloudinary provide browser-based interfaces for working with assets visually.
-
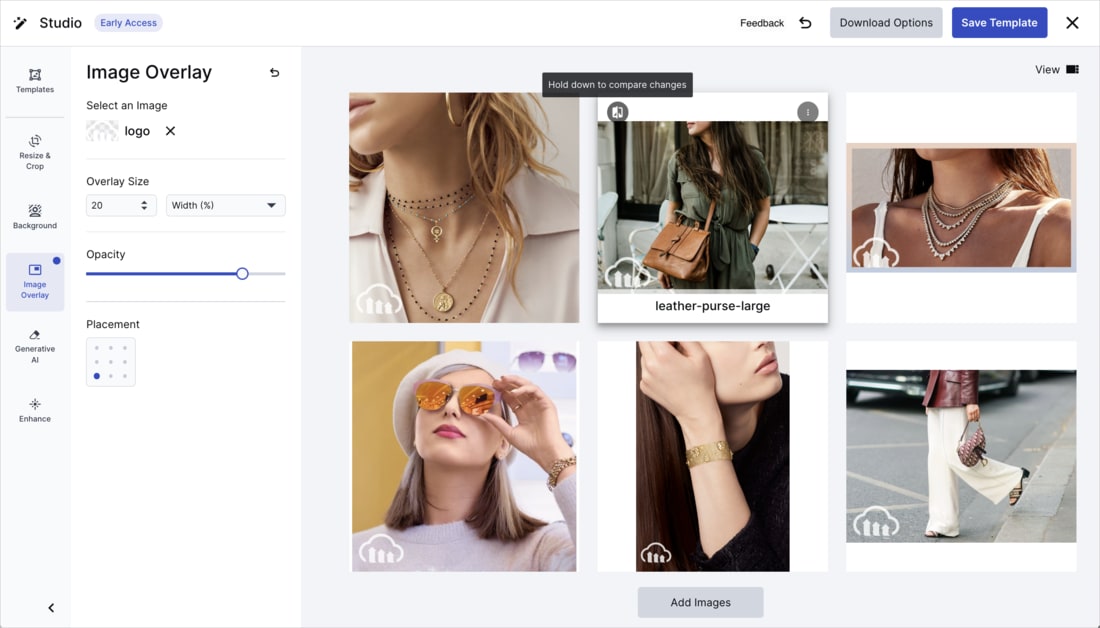
The Image Studio allows you to quickly explore and apply transformations without code. For more information, see Studio in the Assets user guide.
-
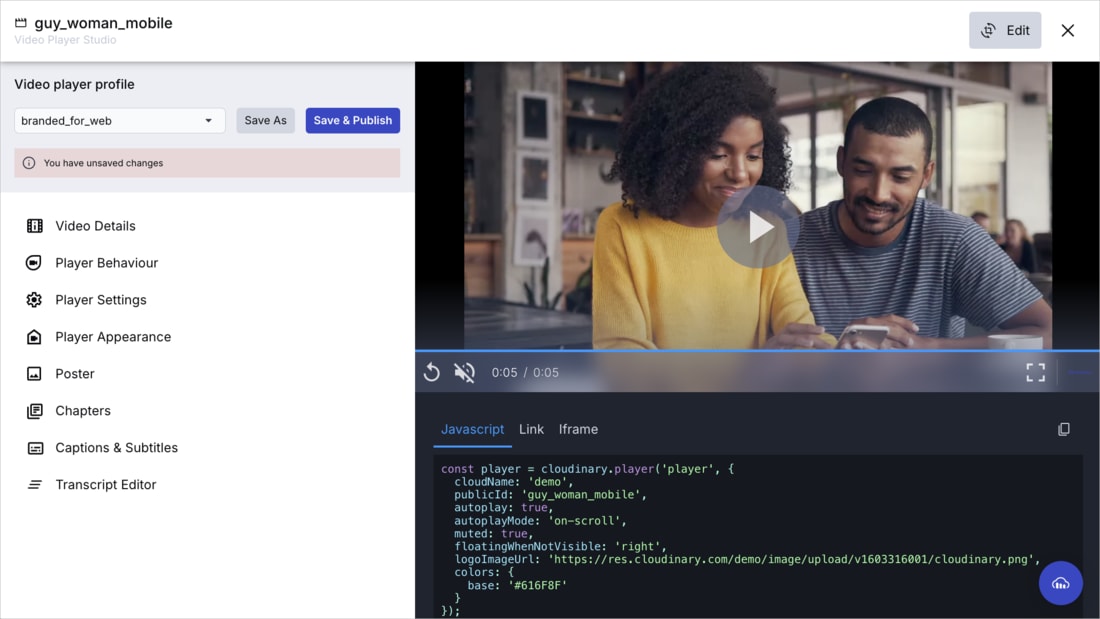
The Video Player Studio, accessible from the context menu of video assets in the Media Library, allows you to preview formats, test transformations, and customize video player settings. You can create a player instance or define a player profile, then copy and paste the generated code into your website or application. For more details, see Video Player Studio in the Cloudinary Video guide.
Deleting assets
It might be useful to delete assets in the Media Library. For example, you can quickly clean up test uploads or remove assets no longer needed in staging product environments.
You can delete assets individually from the context menu, or in bulk by selected the assets you want to delete and clicking the delete icon in the assets toolbar.
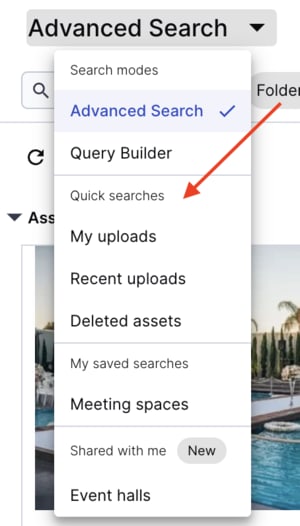
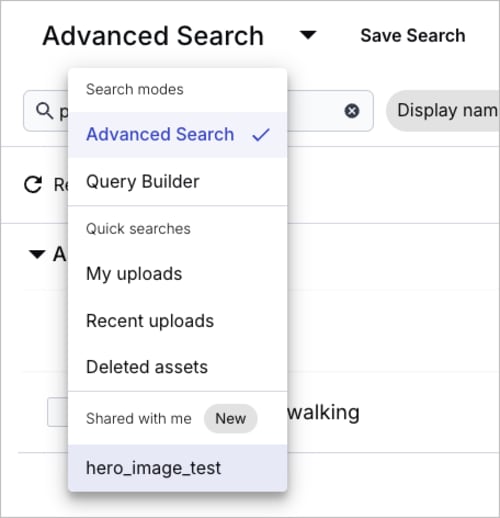
If you've deleted assets and then realize that you want to restore them, you can do so using the using the Deleted assets quick search to find your deleted assets. For more information, see Advanced Search.
Searching for assets
When experimenting with transformations, testing conditional logic, or validating delivery behavior in your code, it’s often helpful to find assets that match specific characteristics. The Media Library includes flexible search tools that make it easy to locate assets with the traits you want to work with.
Global search
A general search bar is available from all Media Library pages (including Assets, Folders, and Moderation). You can use it to search by public ID, containing folder, format, tag, or other basic properties.
Advanced search
For more precise filtering, use the Advanced Search, available from the Assets page. It provides both easy-to-use filter options and a query text box, where you can enter search terms or structured expressions for more complex searches.
Advanced Search is especially useful when you need to:
Find images by aspect ratio (e.g., square, portrait, landscape).
Filter videos by duration (e.g., less than 10 seconds).
Locate assets with specific tags or structured metadata values.
Isolate assets by format, size, dimensions, or upload date.
Combine multiple conditions using a free text box that also accepts queries.
Find and restore deleted assets.
Restore deleted assets
If you've deleted assets and then realize that you want to restore them, you can do so using the using the Deleted assets quick search to find your deleted assets.
Refine the search and then click Restore for the asset you want to keep.
Query builder
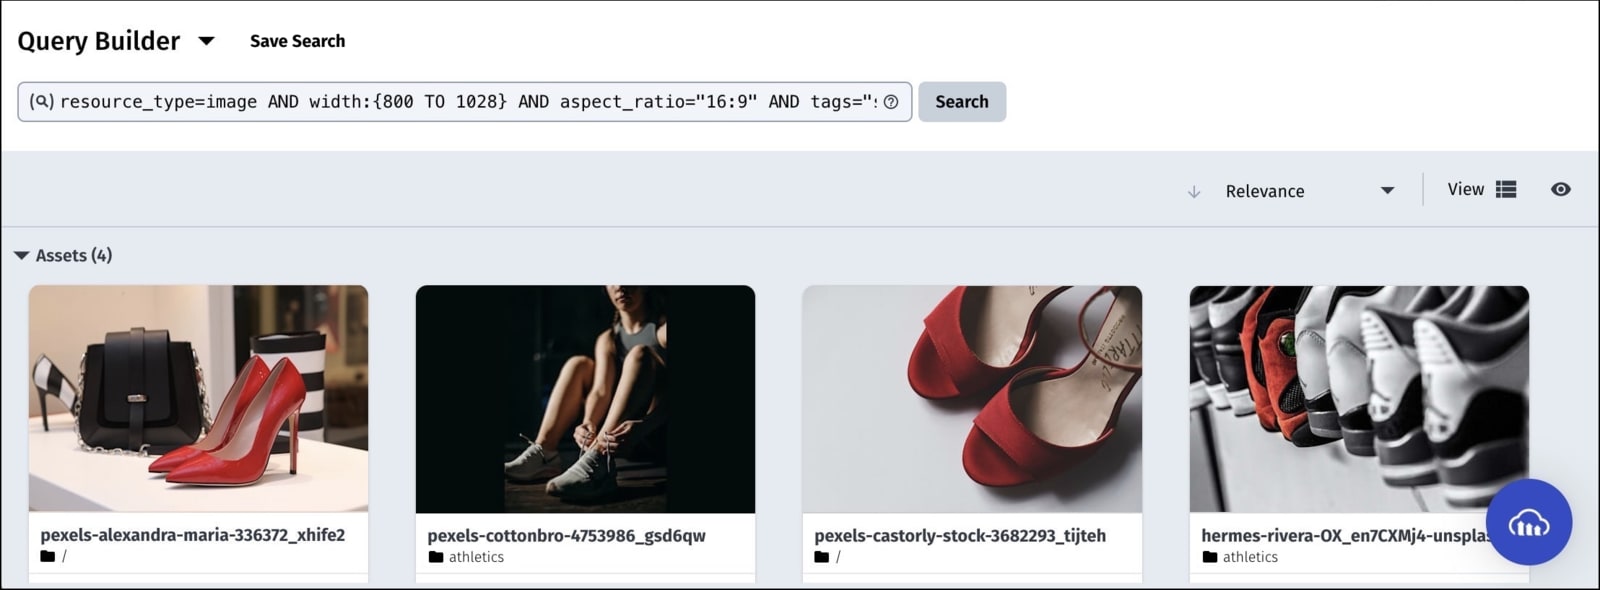
The Query builder enables you to perform complex searches by entering search expressions into the search bar using the Search expression syntax. You can use the Query builder to try out search queries that you plan to apply programmatically using the Search API method to refine them and make sure they work before using them in your code.
Saved searches
If you’ve created a search you’ll want to reuse, you can save it with a custom name and access it anytime from the search drop down.
Moderating assets
If your upload flow includes moderation—whether manual or automated—you can use the Moderation page in the Media Library to review and manage assets based on their moderation status.
This is especially useful during development when you want to verify that moderation rules are being applied correctly, check whether assets are assigned the expected status, manually approve or reject assets to test app behavior, or filter assets to review flagged or pending uploads.
Click the Moderation tab at the top of the Media Library to view assets grouped by status—Pending, Approved, or Rejected. Each asset includes a context menu where you can manually change its status, which is helpful for testing moderation workflows or simulating reviewer actions.
For more information, see Moderating assets via the Media Library.
The Media Library for DAM use cases
The Media Library offers various additional features to support DAM use cases. These tables describe the various options:
| Option | Description | Considerations |
|---|---|---|
| Display settings | Customize how assets appear in Card and List views. | ✅ Card View: Set card size, toggle metadata, choose when details appear ✅ List View: Choose visible columns, including custom metadata |
| Transformation templates | Apply saved transformations to assets in one click. | ✅ Saves time and ensures consistency ✅ Easy to preview or download |
| Structured metadata management | Create and manage many structured metadata fields via UI. | ✅ Easier than code-based setup ✅ Ideal for non-technical users💡 Free plan: up to 10 fields |
| User limit | Set how many users can access the Media Library. | ✅ Scales with team size ✅ Supports collaboration across roles💡 Free plan: up to 3 users |
| Conditional metadata rules | Define logic between metadata fields to enforce consistency. | ✅ Create field dependencies with no code ✅ Helps standardize input |
| Embedded metadata | View and search metadata from source files (EXIF, IPTC, etc.). | ✅ Useful for location, device, or rights info ✅ Supports editorial/legal review |
| Related assets | Link related files to improve context and discovery. | ✅ Quickly find brand guidelines for a logo ✅ See transcripts, posters, and more for a video✅ Access alternate views of a product |
| Search Tier 2 | Unlock advanced search via metadata, image analysis, and aggregation. | ✅ Search by color, metadata, or file traits ✅ Use aggregations in API for dynamic filters |
| Commenting | Add comments directly to assets, with @mentions and email alerts. | ✅ Centralizes feedback ✅ Notifies tagged users✅ Supports async collaboration |
| Collections | Group assets without changing folder location. | ✅ Shareable, customizable pages ✅ Organize by campaign or theme💡 Free plan: 3 collections |
| Dynamic collections | Auto-update collections based on rules (e.g., tag, date). | ✅ Saves time ✅ Always current💡 Free plan: 1 dynamic collection |
| Homepage customization | Customize the Media Library landing page. | ✅ Add branding, saved searches, featured content ✅ Highlight key workflows |
| Reports | View usage and activity reports across assets. | ✅ Measure engagement ✅ Inform strategy |
| Dashboard | Visualize KPIs and asset usage in one place. | ✅ Ideal for oversight and reporting |
| Preferences | Set team-wide defaults for views and search settings. | ✅ Aligns UI with workflows ✅ Improves usability |
| Option | Description | Considerations |
|---|---|---|
| Portals | Create branded, public-facing galleries for curated asset sets. | ✅ Ideal for press kits, campaigns, or client delivery ✅ Supports filters, search, and downloads✅ Customizable look and feel |
| Creative approval | Enforce a review process for uploaded assets before they’re available for use. | ✅ Ensures brand and quality standards ✅ Lightweight and easy to set up✅ Great for external uploads or high-visibility assets |

