Showing posts with label Python. Show all posts

Wednesday, July 18, 2012

Say Hello to Python Flask Server

What is Flask Server?


From the official Flask website, Flask is a micro web development framework for Python based on Werkzeug (a WSGI utility library for Python),  Jinja 2 (a modern and designer friendly templating language for Python) and good intentions. It's released under BSD license
Some of the features of flask are: 
  • Built-in development server and debugger.
  • Integrated support for unittesting support. 
  • RESTful request dispatching. 
  • Uses Jinja 2 templating. 
  • Support for secure Cookies. 
  • 100% WSGI 1.0 complaint. 
  • Unicode based.
  • Extensively documented.
So, enough of the theoretical detail, lets start with the practical :). 

 Installation 

Flask depends on two external libraries, Werkzeug and Jinja2. So how do we get it to our local machine? There are many ways to do it but I did it with virtualenv. Now, for someone like me who is new to Python, the next question is "What the hell is a virtualenv?". Well virtualenv is a tool to create isolated Python environments. You can find more details on the official website.

So how do we get virtualenv. Well that's very simple. 

Note: 

1. The installation I did was on a Linux Fedora 14 machine with root privileges, there is a possibility that few of the commands can differ from one version of Linux to another.
2. Another thing, I am considering that you already have Python, python-setup-tools and python-pip installed on your machine. In case you don't have it and don't know how to get it see my last post "Getting Ready with Python-PIP".

Installing Virtualenv

You can get virtualenv package using easy_install or python-pip. In my case, I used python-pip. fire up a shell and run following commands: 

pip-python install virtualenv
This command will give you this:
[root@localhost dev]# pip-python install virtualenv

Downloading/unpacking virtualenv
Downloading virtualenv-1.7.tar.gz (2.1Mb): 2.1Mb downloaded
Running setup.py egg_info for package virtualenv

warning: no previously-included files matching '*.*' found under directory 'docs/_templates'
Installing collected packages: virtualenv

Running setup.py install for virtualenv

warning: no previously-included files matching '*.*' found under directory 'docs/_templates'
Installing virtualenv script to /usr/bin
Successfully installed virtualenv
Cleaning up...
[root@localhost dev]#

Once the virualevn installation is done the next step is to setup a virtual environment. 

Setting up virtual environment with virtualenv

To setup a virtual environment for python with virutalenv is very simple. 
Step 1 is to create a folder in which you want to have python virtual environment and then create  virtualenv folder within it. Run following commands:
mkdir flaskTestServer
cd flaskTestServer
virtualenv venv
The above set of commands will give you following: 
[root@localhost Dev]# mkdir flaskTestServer
[root@localhost Dev]# cd flaskTestServer/
[root@localhost flaskTestServer]# ll
total 0
[root@localhost flaskTestServer]# virtualenv venv
New python executable in venv/bin/python

Installing setuptools............done.
Installing pip...............done.
Once that's done you just have to activate the virtual environment you just created: 
[root@localhost flaskTestServer]# . venv/bin/activate
(venv)[root@localhost flaskTestServer]#
And you are all set to install you flask server in your own virtual environment. 

Installing Flask Server

Simply run following command:
(venv)[root@localhost flaskTestServer]# pip install flask
And you are all set to start developing your own flask server and run it. 

Example

Now lets make a flask web server to say hello to the world. It's very simple, very very simple.
Make a python script, lets say flaskHelloWorld.py and put in following code: 

from flask import Flask
app = Flask(__name__)
@app.route('/')
def hello_world():
    return 'Hello World!'
if __name__ == '__main__':
    app.run()
So, what did we do here: 
  1. First we imported the Flask class. An instance of this class will be our WSGI application. The first argument is the name of the application’s module. If you are using a single module (as in this example), you should use __name__ because depending on if it’s started as application or imported as module the name will be different ('__main__' versus the actual import name). For more information, have a look at the Flask documentation.
  2. Next we create an instance of this class. We pass it the name of the module or package. This is needed so that Flask knows where to look for templates, static files, and so on.
  3. We then use the route() decorator to tell Flask what URL should trigger our function.
  4. The function is given a name which is also used to generate URLs for that particular function, and returns the message we want to display in the user’s browser.
  5. Finally we use the run() function to run the local server with our application. The if __name__ == '__main__': makes sure the server only runs if the script is executed directly from the Python interpreter and not used as imported module.
And run it with Python.
(venv)[root@localhost flaskTestServer]# python flaskHelloWorld.py
 
* Running on http://127.0.0.1:5000/
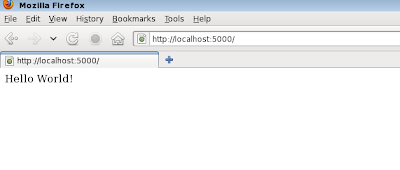
Now open up a browser and go to the address  http://localhost:5000/ or http://127.0.0.1:5000/ and flask will say hello to you like in the screen-shot below:


And that's it. Wasn't that easy :).

Tuesday, July 17, 2012

Getting Ready with Python-PIP

As I mentioned in my earlier post on Python in Eclipse [PyDev Plugin for Eclipse], that I am new to Python. I decided to post the issues I face during my Python experience. And for this post the motivation was python-pip

What is Python-pip?

pip is a tool for installing and managing Python packages, like the ones which can be found under the Python Package Index. It's a replacement for a previous tool, easy_install. More details can be found here.

Dependencies of Python-pip

  • Python 2.7: If you don't have python installed then you can follow the instruction from Tutorial Point.
  • Python setup tools.
    In case if you don't have python-setup-tools then:
    • Download the RPM installer package for python-setup-tools. In my case I am on Linux Fedora 14 and downloaded the RPM package file from here.
    • Once you have downloaded the python-setup-tools RPM package file. Install it with RPM command from shell:
      rpm -i python-setuptools-0.6.14-3.fc14.noarch.rpm
    • And its done for python-setup-tools.

Installing Python-pip

After getting all the dependencies, you are all set to install the python-pip package. The first thing to do now is to download the python-pip RPM installer for your linux version. As mentioned earlier that I am using Fedora 14, I downloaded the rpm package file for python-pip from here.
rpm -i python-pip-0.8.3-1.fc14.noarch.rpm
After this, the you are ready to use python-pip to install python packages.

Using Python-pip

The list of package that can be installed using python-pip can be found here.

To get packages:

To get and install a package using python-pip, simply run following command: 
$ pip install {package_name}
 or if that doesn't work then try:
$ pip-python install {package_name}


To uninstall a package:

To remove a python package, run following command:
$ pip-python uninstall {package_name}

To upgrade a package:

To remove a python package, run following command:
$ pip-python --upgrade {package_name}

I hope this helps you. Feel free to share your experience/issues.

Tuesday, June 26, 2012

Python in Eclipse [PyDev plugin for Eclipse]

While learning python, one question I had was, which python IDE to use? There are many options but being a Java developer I wanted to have something like Eclipse and it turned out that there is a plugin for eclipse which can be used for Python development with the auto-suggest, run, debug and many other features.

The plugin for eclipse is called PyDev and it's very easy to configure. 
Note: I work on a windows machine, so all the instructions are around a windows machine. 
  • Get Python:
    • Download the recent version of python from python.org.
    • Run the setup file (python-.msc) and follow the install insrtuction. 
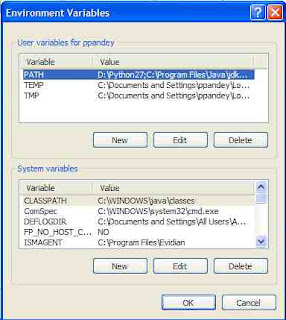
    • Once the installation is complete, set the windows environment variable to point to the python installation folder.
      • Right click on "My Computer".
      • Select "properties". 
      • Click on the button "Environment Variables" under the tab "Advanced".


      • Add the path of python installation to the PATH variable, in my case its "D:\Python27\".


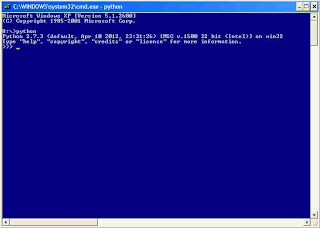
    • Go to dos command line and type the command ">python", if it takes you to the python command line, then it works.


  • Get Eclipse and install the PyDev plugin.
    • Download a version of Eclipse IDE from here do the setup you need for other dev. 
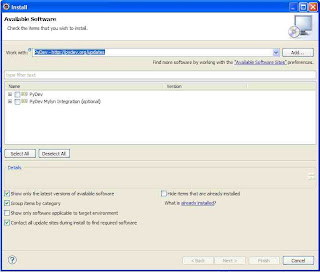
    • Now from Eclipse menu go to Help -> Install New Software
    • Add the PyDev update site http://pydev.org/updates.


    • Install the plugin. 
  • Configuration of Eclipse. 
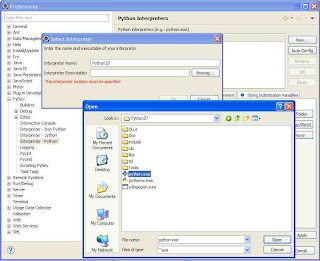
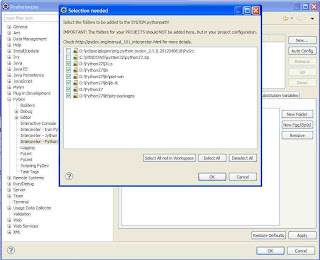
    • From eclipse menu, open Window -> Preferences.
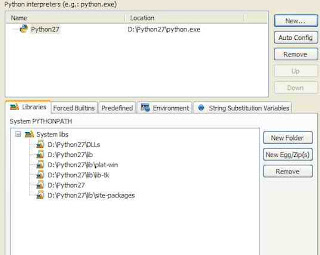
    • Look for PyDev -> Interepreter - Python.
    • Click on new and add the python.exe.
      • For windows, it was under the python installation i.e. d:\python27.
      • For linux, find it by running the command >which python


And all done, you are good to go... Play with python in eclipse.


Also check out my new post on Python-pip tool. 

Thursday, June 21, 2012

Django - Overview


DJango

Overview

What is Django ?

Django is high-level Python Web framework that was released under BSD license in 2005. It emphasizes re-usability, rapid development and DRY (don’t repeat yourself) principle. There are a lot of great web development frameworks available, like Ruby on rails and Codeigniter for PHP that follow same principles so we could say that Django is just another fast development web framework but with different flavor. With the help of Django, a developer can build and maintain high-quality Web applications with minimal effort.

Why use Django?

  • Django is fast and stable.
  • It’s very scalable.
  • Let’s you work outside the scope of the framework as required.
  • Fast development and code readability.
  • Very well documented.
  • And the list goes on about Django’s pros over other web development frameworks.

Required Knowledge

  • Should have the basic understanding of procedural and object-oriented programming: control structures (e.g. if, while, for), data structures (lists, hashes/dictionaries), variables, classes, objects, etc.
  • At least hands on experience with programming in Python and understanding of how libraries work. If you don’t know python, click here.