Modern Test Automation With AI (LLM) and Playwright MCP
Learn how GenAI and Playwright MCP transform QA with natural language test creation, self-healing scripts, dynamic flows, and seamless browser automation.
Join the DZone community and get the full member experience.
Join For FreeDelivering high-quality applications at scale is a constant challenge. Traditional test automation, while powerful, often struggles with dynamic user interfaces, flaky tests, and time-consuming script maintenance.
This blog explores how generative AI (GenAI) and Playwright MCP (Model Context Protocol) work together to streamline QA processes, boost efficiency, and empower testers to focus on strategic tasks.
Problem Statement
Large language models (LLMs) like ChatGPT, Gemini, Claude, and DeepSeek are powerful tools that can process complex queries, generate code, write emails, and even simulate conversations — all using natural language. But there’s a catch:
LLMs can think, but they can’t act.
The Limitations of LLMs
LLMs are designed to understand and generate human-like text, but they lack the ability to directly interact with external resources.
- Opening a browser: You can’t instruct an LLM to launch a browser and perform actions like navigating to a website or clicking buttons.
- Database connectivity: LLMs cannot connect to a database to fetch or update records.
- API interactions: While LLMs can generate API request code, they cannot execute those requests or handle real-time responses.
LLMs handle the “thinking” (e.g., generating prompts, code, or logic).
MCPs handle the “doing” (e.g., executing actions, connecting to resources, and automating workflows).
Evolution of MCP
The ability to interact with the web programmatically is becoming increasingly crucial. This is where GenAI steps in, by leveraging large language models (LLMs) like Claude or custom AI frameworks, GenAI introduces intelligence into test automation, enabling natural language test creation, self-healing scripts, and dynamic adaptability.
The bridge that makes this synergy possible is the Model Context Protocol (MCP), a standardized interface that connects GenAI’s cognitive power with Playwright’s automation prowess.
Role of MCPs
MCPs bridge the gap between LLMs and real-world applications by providing a framework to integrate multiple components, including browsers, databases, APIs, and more. Unlike LLMs, MCPs are designed to orchestrate complex workflows that involve external resources.
For instance:
- Browser automation: An MCP can open a browser, navigate to a specific URL, and perform actions like filling out forms or scraping data.
- Database operations: MCPs can connect to databases, run queries, and process the results, enabling dynamic data-driven applications.
- API integration: MCPs can make API calls, handle responses, and pass the data to other components for further processing.
MCP Architecture and Core Components
Model Context Protocol (MCP), as described, is an open-source protocol developed by Anthropic to create a consistent method for large language models (like Claude) to interact with external systems, such as databases, APIs, or tools.
By standardizing this communication, MCP ensures that LLMs can seamlessly integrate with diverse external resources without requiring custom solutions for each combination of model and system.
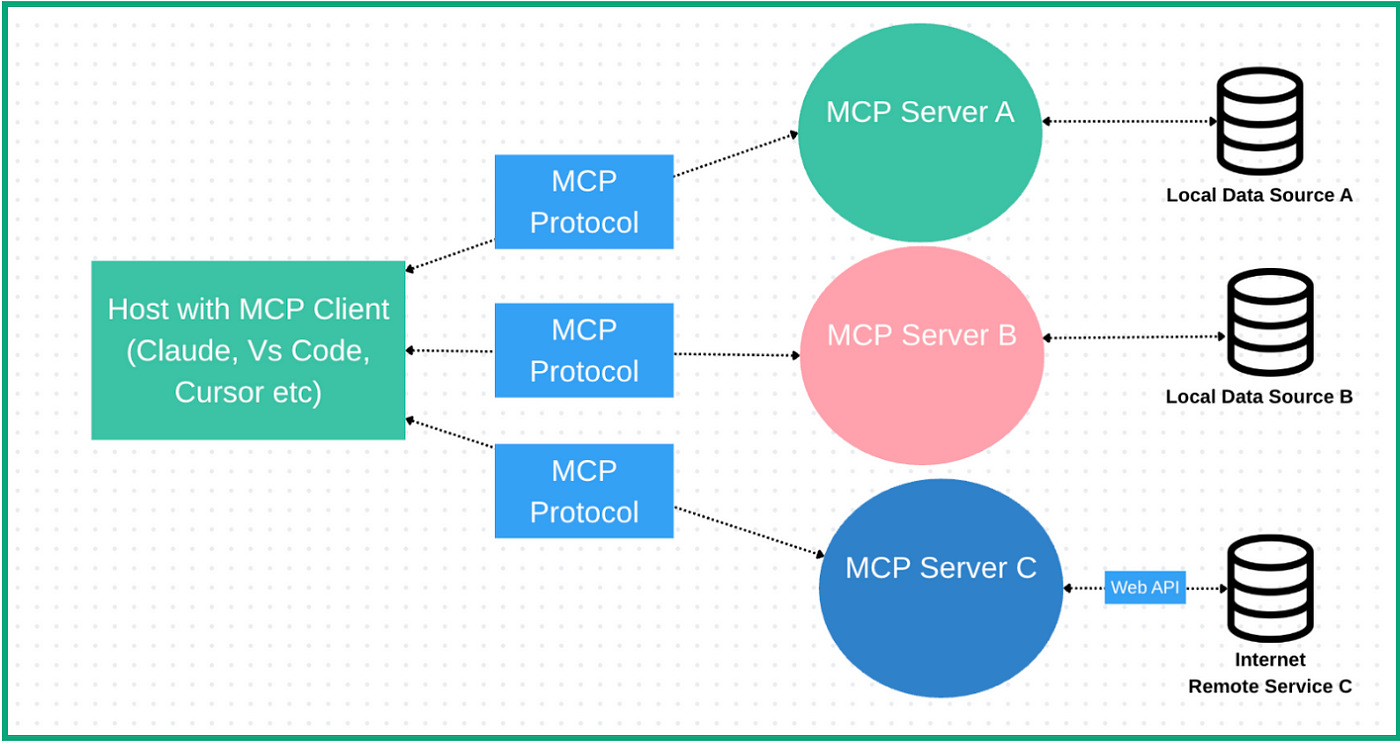
At its core, MCP follows a client-server architecture where a host application can connect to multiple servers:
- MCP hosts: Programs like Claude Desktop, Cursor, VS Code IDEs, or AI tools that want to access data through MCP
- MCP clients: Protocol clients that maintain 1:1 connections with servers
- MCP servers: Lightweight programs that each expose specific capabilities through the standardized MCP. Each standalone server typically focuses on a specific integration point, like GitHub for repository access or PostgreSQL for database operations.
- Local data sources: Your computer’s files, databases, and services that MCP servers can securely access.
- Remote services: External systems available over the internet (e.g., through APIs) that MCP servers can connect to
How Model Context Protocol (MCP) Works
Model Context Protocol (MCP), as described, is an open-source protocol developed by Anthropic to create a consistent method for large language models (e.g., Claude) to interact with external systems, such as databases, APIs, or tools.
By standardizing this communication, MCP ensures that LLMs can seamlessly integrate with diverse external resources without requiring custom solutions for each combination of model and system.
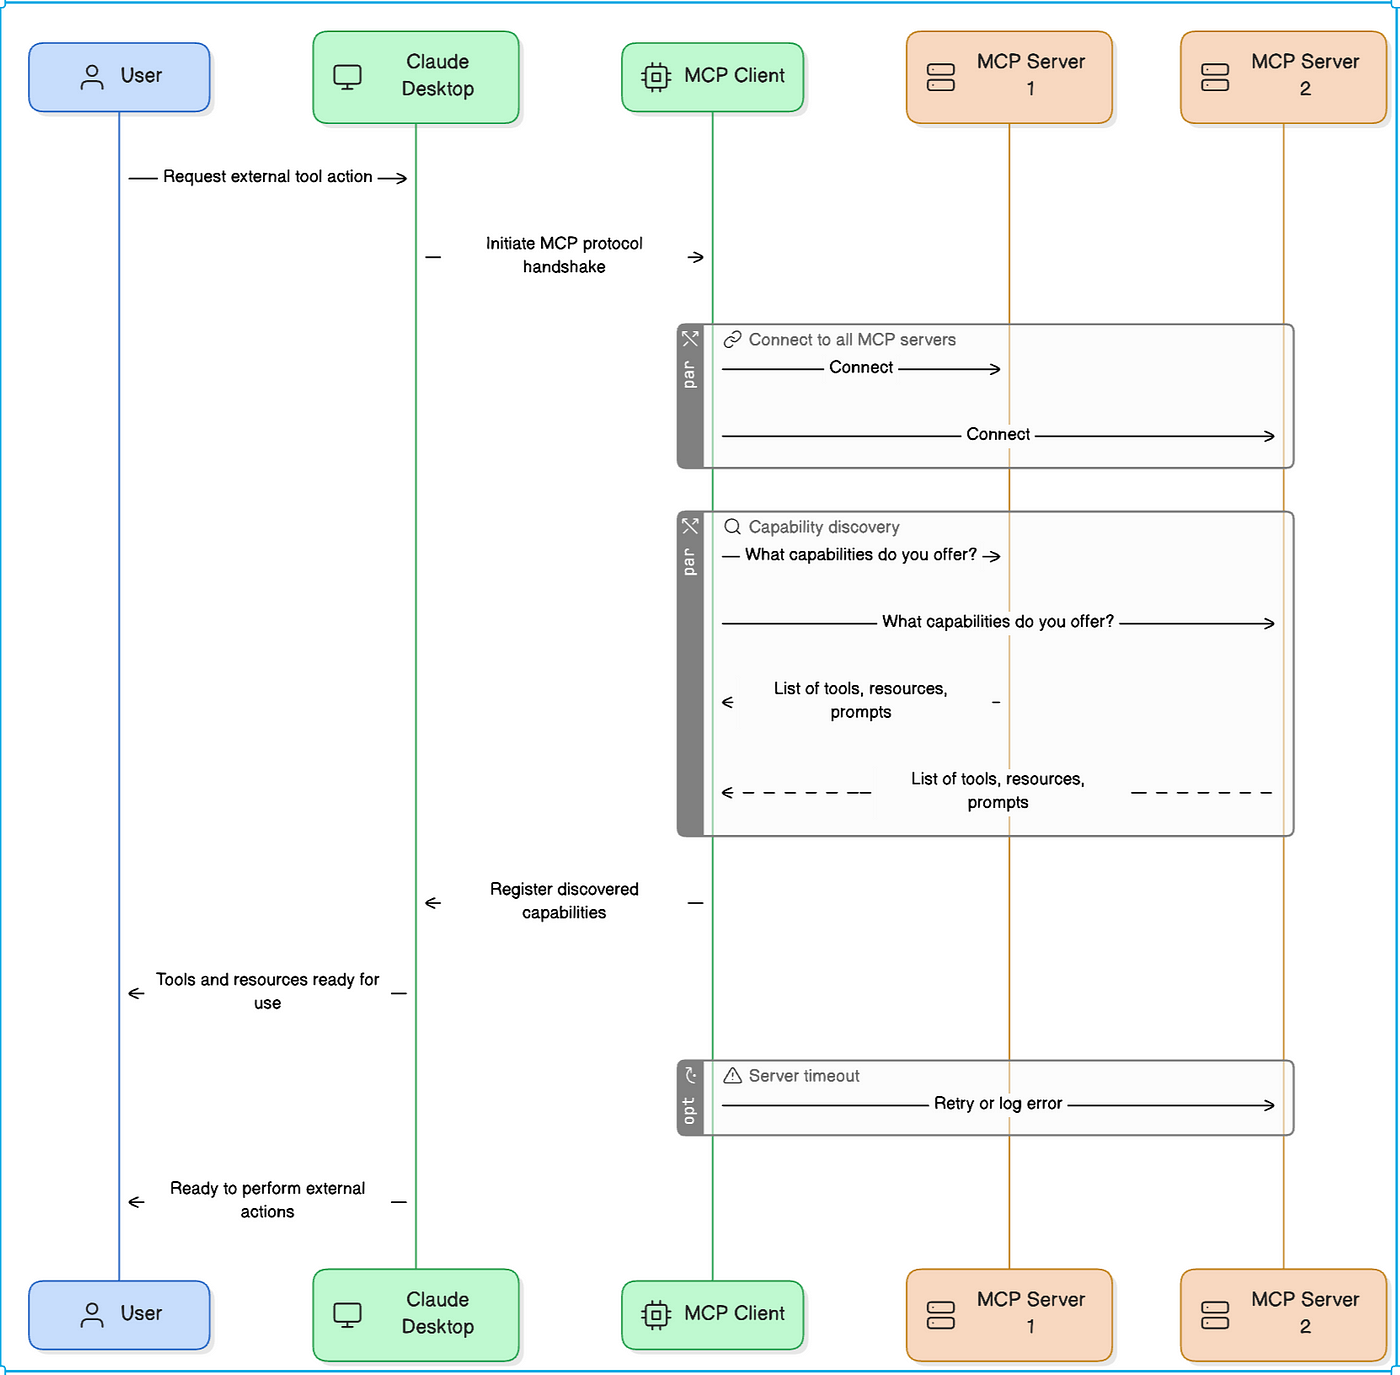
MCP Flow
Let’s try to understand how MCP works by taking the LLM Claude Desktop as an example.
1. User → Claude Desktop
- Request external tool action: The user asks Claude to do something that requires a tool for — e.g., open a file, browse a webpage, or log in somewhere.
2. Claude Desktop → MCP Client
- Initiate MCP protocol handshake: Claude asks the MCP client to connect to available MCP servers to see what tools they offer.
3. MCP Client → MCP Servers
- Connection phase: The MCP client tries to connect to all configured MCP servers (e.g., Server 1 and Server 2).
4. Capability Discovery Phase
- MCP Client sends: What capabilities do you offer?”
- Each server responds with a list of available tools, resources, and prompts.
5. MCP Client → Claude Desktop
- Claude receives the collected information and registers the discovered capabilities, meaning it knows what tools are available and can use them during conversation.
6. Claude Desktop → User
- Claude informs the user that the tools and resources are now ready.
- Now, Claude can act on the original user request (e.g., open a browser, log in, fetch files, etc.).
Example of MCP Servers
Below are some examples of MCP servers:
PostgreSQL MCP Server
- Executes read-only SQL queries on connected PostgreSQL databases.
- Maintains safety by restricting operations to data retrieval only.
MySQL MCP Server
- Executes read-only MySQL queries.
- Useful for validating test data or fetching test-related metrics.
Selenium MCP Server
- Facilitates browser automation through the Model Context Protocol for Selenium WebDriver, supporting Chrome and Firefox browsers.
GitHub MCP Server
- Automates actions like pushing code and analyzing repositories.
Playwright MCP Server
- Enables LLMs or agents to control a Playwright-managed browser using structured commands.
Docker MCP Server
- Controls Docker containers, images, and volumes through natural language.
What Is Playwright MCP?
Playwright MCP is a server that acts as a bridge between large language models (LLMs) or other agents and Playwright-managed browsers. It enables structured command execution, allowing AI to control web interactions like navigation, form filling, or assertions. What sets MCP apart is its reliance on the browser’s accessibility tree — a semantic, hierarchical representation of UI elements—rather than screenshot-based visual interpretation.
In Snapshot Mode, MCP provides real-time accessibility snapshots, detailing roles (e.g., button), labels (e.g., “Submit”), and states (e.g., disabled). This approach is lightweight and precise, unlike Vision Mode, which uses screenshots for custom UIs but is slower and less reliable. By prioritizing the accessibility tree, MCP delivers unparalleled speed, reliability, and resource efficiency.
Accessibility Tree — Recap
The Accessibility Tree is how assistive technologies “see” your web application. It includes information about elements such as:
- Role (e.g.,
button,textbox) - Name (e.g., the label that describes the element)
- State (e.g.,
checked,disabled) - Hierarchy (e.g., parent/child relationships)
Key Features of MCP
- Structured data exchange: MCP provides accessibility snapshots of the DOM (roles, labels, states), making it easier for AI to understand and interact with web elements.
- Real-time interaction: It enables AI to dynamically adjust test flows based on live browser states, reducing flaky tests.
- Tool-agnostic design: MCP’s open standard can integrate with various AI models and automation frameworks, though it shines with Playwright’s robust APIs.
In the context of Playwright, MCP acts as a server that sits between the AI model and the browser, translating high-level test instructions into executable scripts while handling complexities like dynamic UIs or cross-browser nuances.
Why GenAI + Playwright MCP Is a Game-Changer
Combining GenAI with Playwright MCP unlocks a new paradigm for test automation, addressing pain points that have long plagued QA teams.
Here’s how:
1. Natural Language Test Creation
Imagine writing test cases in plain English without touching a line of code. With GenAI and MCP, testers can describe scenarios like, “Navigate to the login page, enter valid credentials, and verify the dashboard loads.” The AI interprets this via MCP, generating Playwright scripts like:
await page.goto('https://example.com/login');
await page.fill('#username', 'testuser');
await page.fill('#password', 'secure123');
await page.click('button[type="submit"]');
await expect(page.locator('.dashboard')).toBeVisible();
2. Self-Healing Tests
UI changes — like a renamed button or updated selector — are a leading cause of test failures. GenAI, powered by MCP, analyzes the DOM in real-time and adapts scripts to these changes. For example, if a button’s ID changes from submit-btn to login-btn, the AI detects the new context and updates the script, saving hours of manual maintenance.
3. Dynamic Test Adaptation
Modern applications often behave differently based on user context (e.g., logged-in vs. anonymous users). MCP enables GenAI to understand these variations and adjust test flows dynamically, ensuring comprehensive coverage without redundant scripts.
4. Faster Test Case Generation
GenAI can analyze an application’s behavior and suggest test cases for edge cases or failure-prone areas. For instance, it might propose testing a form’s error handling for invalid inputs, which MCP then converts into Playwright tests. This reduces the time to achieve high test coverage.
5. Scalability and Integration
Playwright MCP integrates seamlessly with CI/CD pipelines (e.g., GitHub Actions, Jenkins) and tools like Claude Desktop or Cursor IDE. Community projects like https://github.com/microsoft/playwright-mcp further enhance its capabilities, supporting API testing and containerized environments.
Playwright MCP Setup Using VS Code
Setting Up Playwright MCP in VS Code
To harness Playwright MCP’s potential, you need to configure it within VS Code, allowing AI agents to communicate with Playwright-managed browsers. Below are two straightforward methods to install and configure MCP.
Method 1: Quick Setup via VS Code Terminal
The fastest way to get started is by registering the Playwright MCP server through VS Code’s terminal. This method is platform-agnostic and works for both stable and Insiders editions of VS Code.
1. Launch VS Code
- Open VS Code (Stable) or VS Code (Insiders).
- Ensure Node.js and npm are installed, as MCP relies on them for execution.
2. Open the Terminal
- Navigate to View > Terminal or use the shortcut Ctrl + ~ (Windows/Linux) or Cmd + ~ (macOS).
For VS Code Stable, run the below command:
code --add-mcp '{"name":"playwright","command":"npx","args":["@playwright/mcp@latest"]}'For VS Code Insiders, run the below command:
code-insiders --add-mcp '{"name":"playwright","command":"npx","args":["@playwright/mcp@latest"]}'Confirm setup:
- This command registers the MCP server, enabling VS Code extensions (e.g., GitHub Copilot or Claude Desktop) to launch it automatically when browser automation is required.
- Test by triggering an AI-driven task, such as generating a Playwright script, to ensure the server starts correctly.
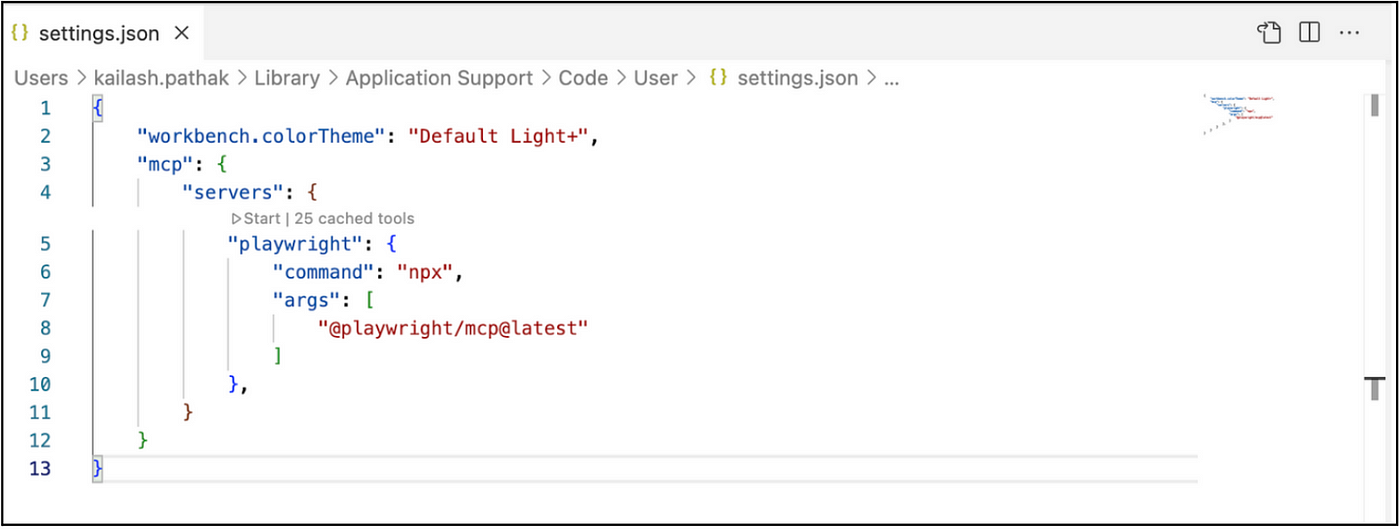
Method 2: Custom Configuration in settings.json
For more control or to tailor the setup, you can manually configure Playwright MCP in VS Code’s settings.json file. This method is ideal for adding custom arguments or integrating with specific workflows.
VS Code Settings
- Go to File > Preferences > Settings or press Ctrl +, (Windows/Linux) or Cmd +, (macOS).
- Click the “Open Settings (JSON)” icon in the top-right corner to edit the settings.json file.
Add MCP Configuration:
- Insert the following JSON structure within the root object:
"mcp": {
     "servers": {
         "playwright": {
             "command": "npx",
             "args": [
                 "@playwright/mcp@latest"
             ]
         },
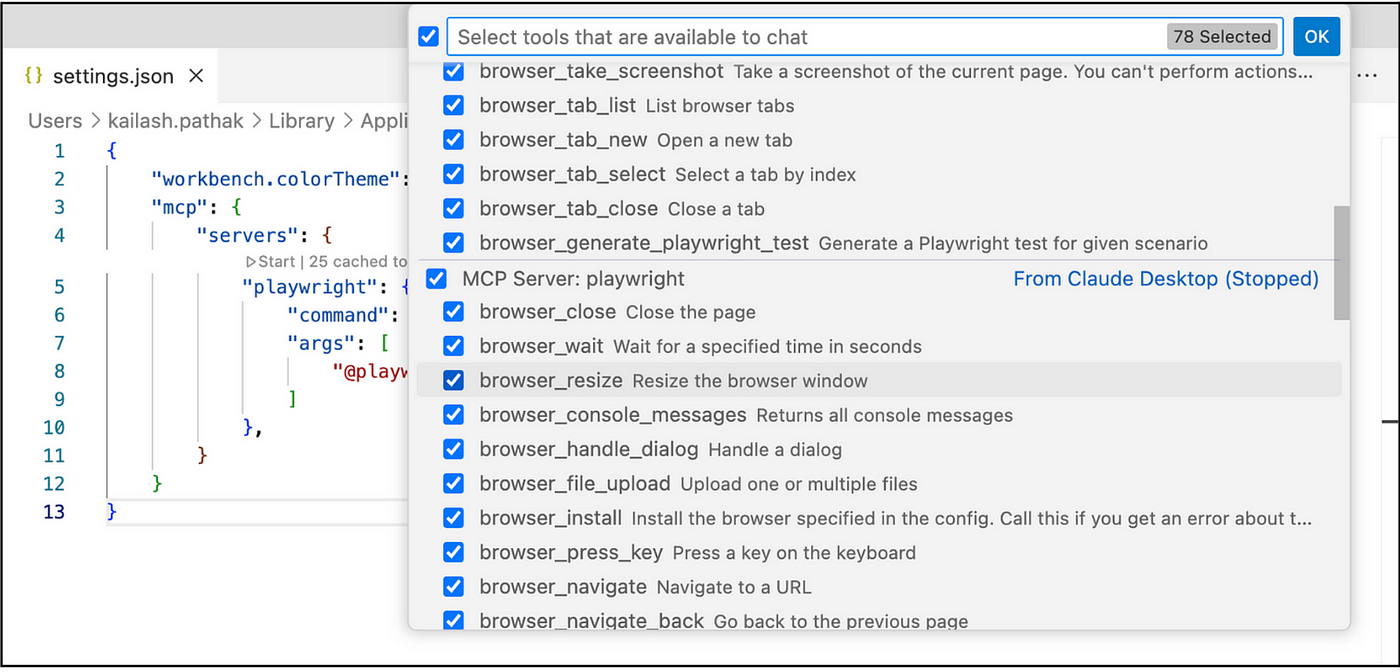
Below are the available tools in the Playwright MCP Server:
Playwright MCP Setup Using Claude Desktop
Below are the available tools in the Playwright MCP Server
Playwright MCP can be configured with Claude Desktop to enable browser automation through natural language prompts, leveraging Claude’s MCP ecosystem.
Setup
- Install Node.js.
- Install Playwright MCP via npx @playwright/mcp@latest.
- Configure Claude Desktop by editing claude_desktop_config.json (e.g., on macOS at ~/Library/Application Support/Claude/claude_desktop_config.json):
json
{
 "mcpServers": {
 "playwright": {
 "command": "npx",
 "args": [
 "@playwright/mcp@latest" ]
 }
 }
}
Claude Setting → Developer → Edit Config:
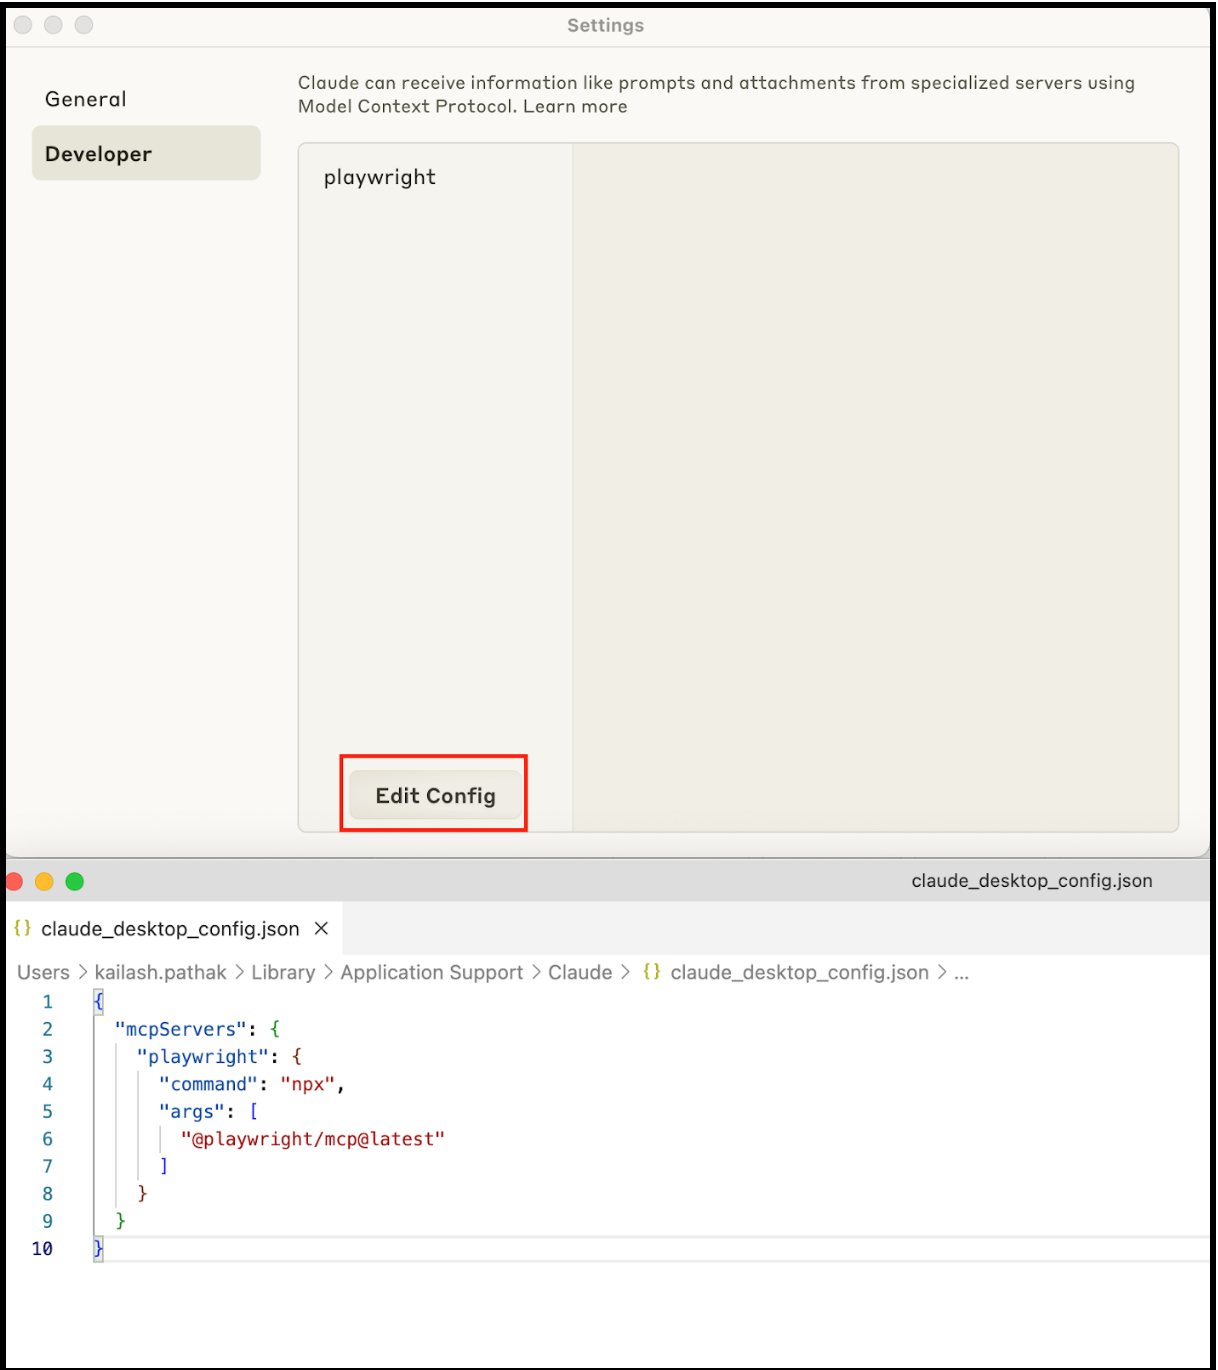
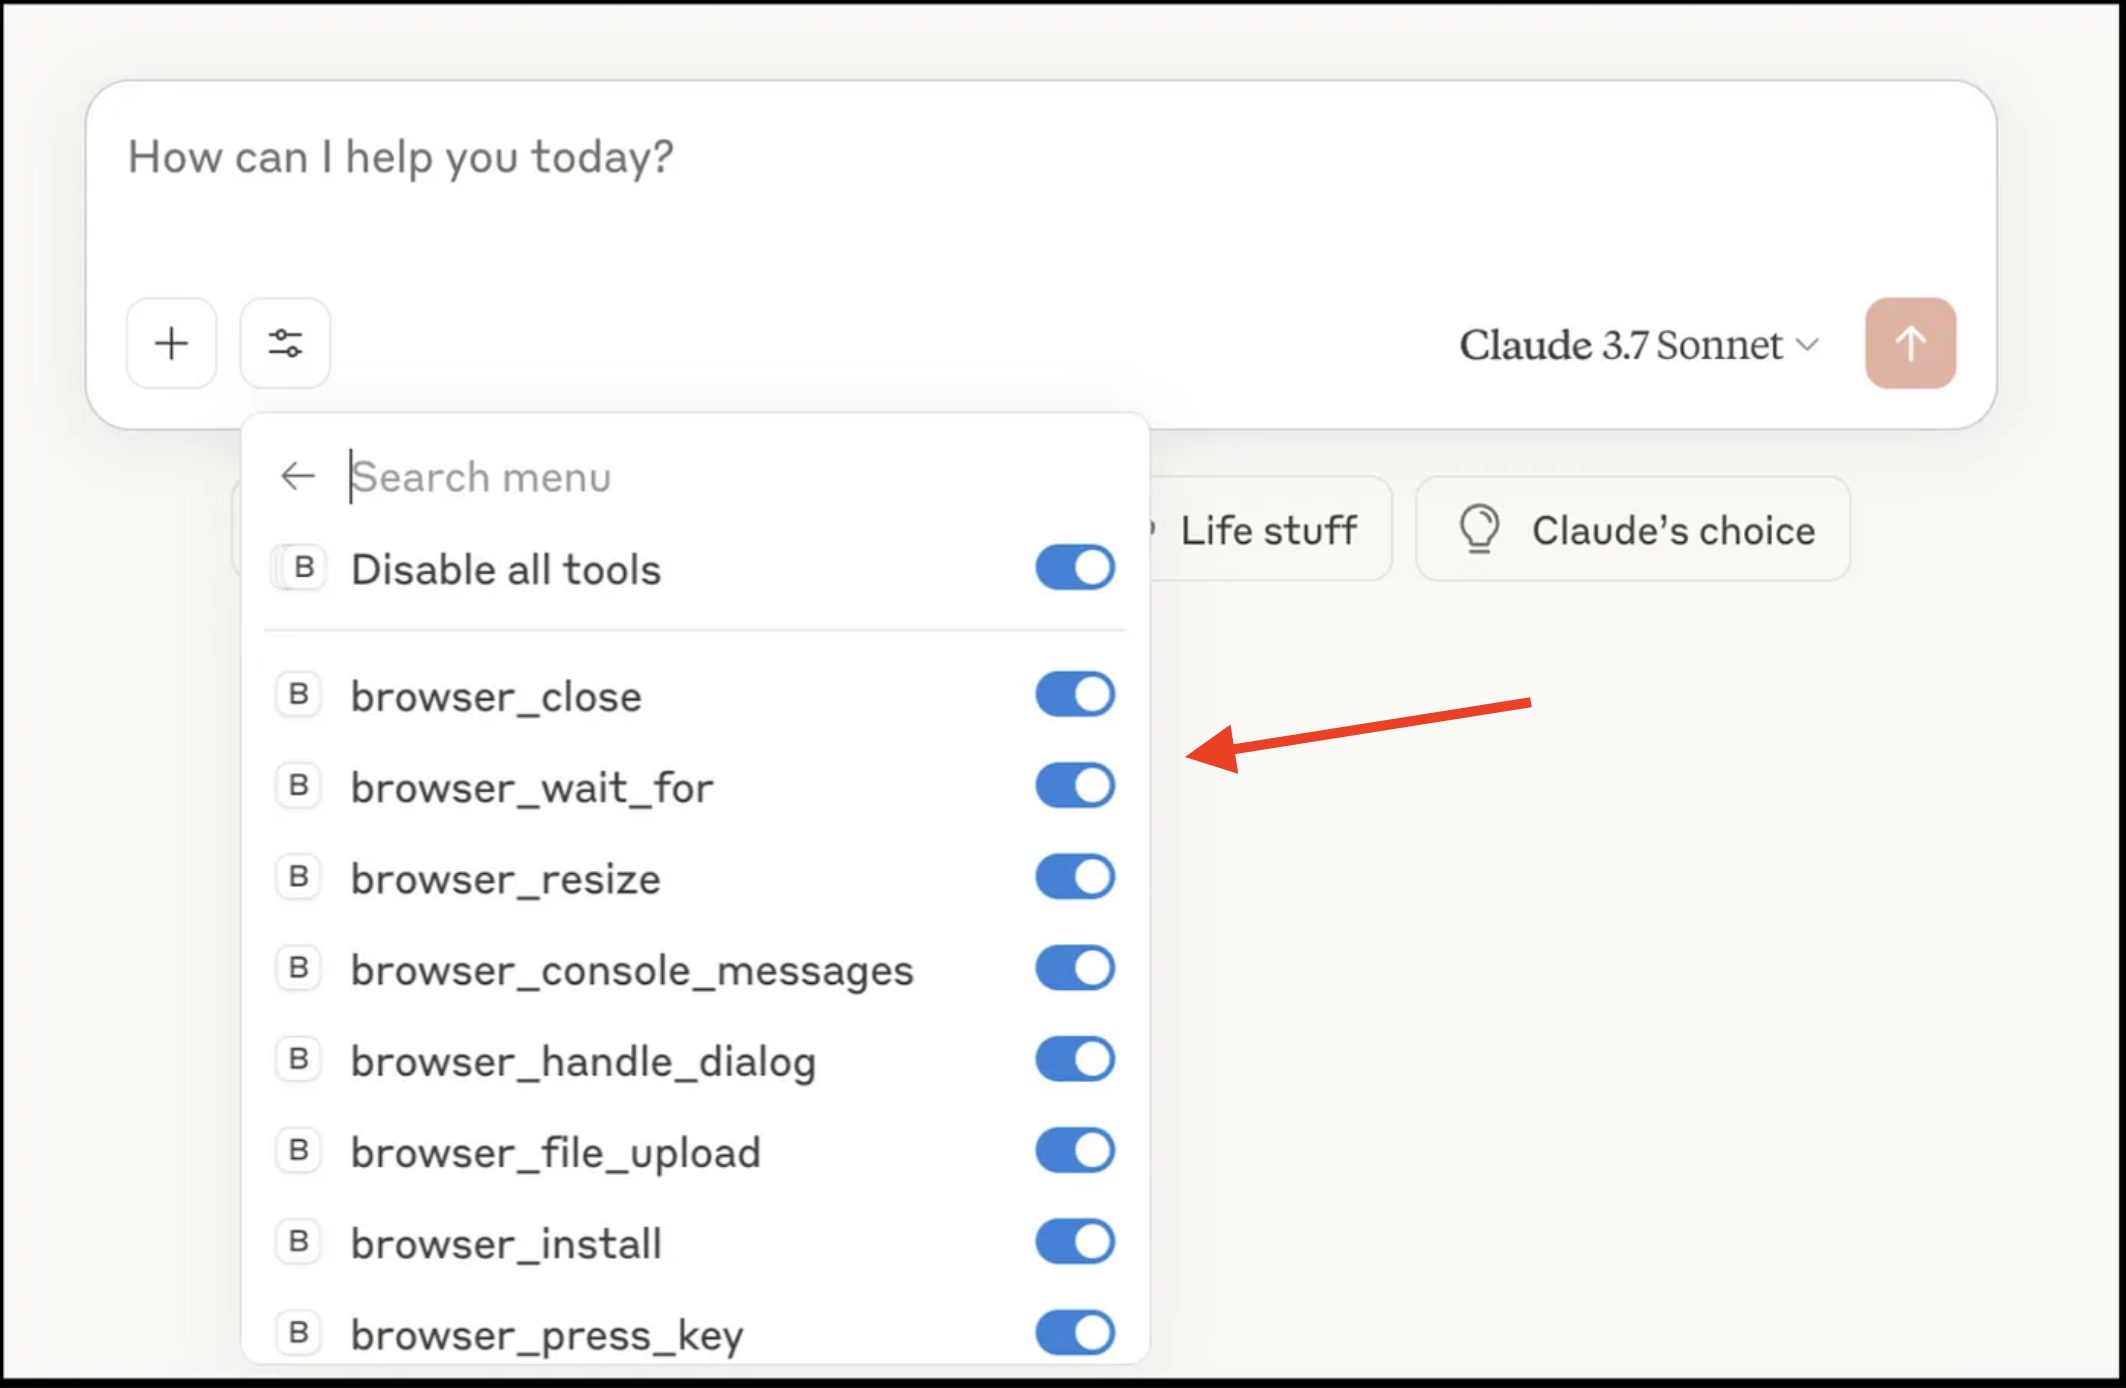
Once the Claude setup is done, we can see the tools under the Claude desktop.
Playwright MCP Setup Using Claude Cursor
Cursor, an AI-powered IDE, uses Playwright MCP to enhance test automation and UI development by providing real-time browser context to its Composer feature.
Setup
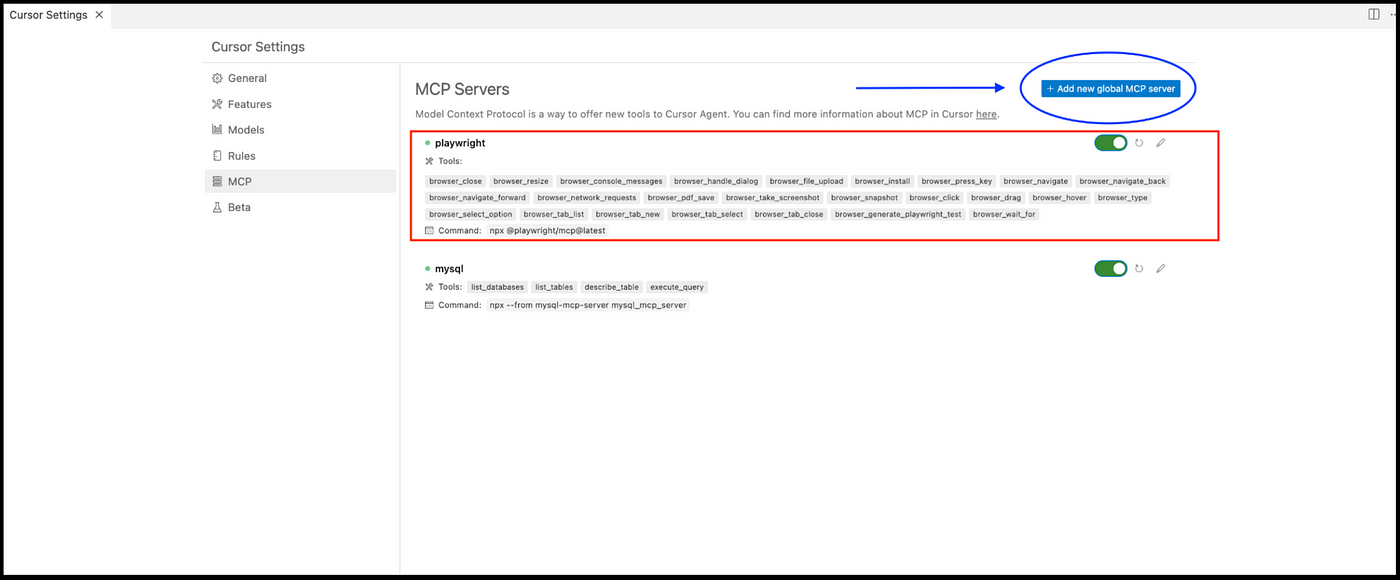
- Configure in Cursor by adding to .cursor/mcp.json.
- Click on Add new global MCP server → Update mcp.json file.
-
Install Node.js and Playwright MCP via npx @playwright/mcp@latest.
{
 "mcpServers": {
 "playwright-mcp": {
 "command": "npx",
   "args": [
        "@playwright/mcp@latest"
      ]
 }
 }
}
Execute Test Cases Using Claude Desktop
Let's take a simple example and execute with the help of Claude Desktop.
Open the site https: //qaautomationlabs.com/.
Click on BLOG tab.
Type all the above instructions in the Claude desktop and execute.
In the screenshot below, you can see that the instructions given were executed successfully.
Execute Test Cases Using Cursor
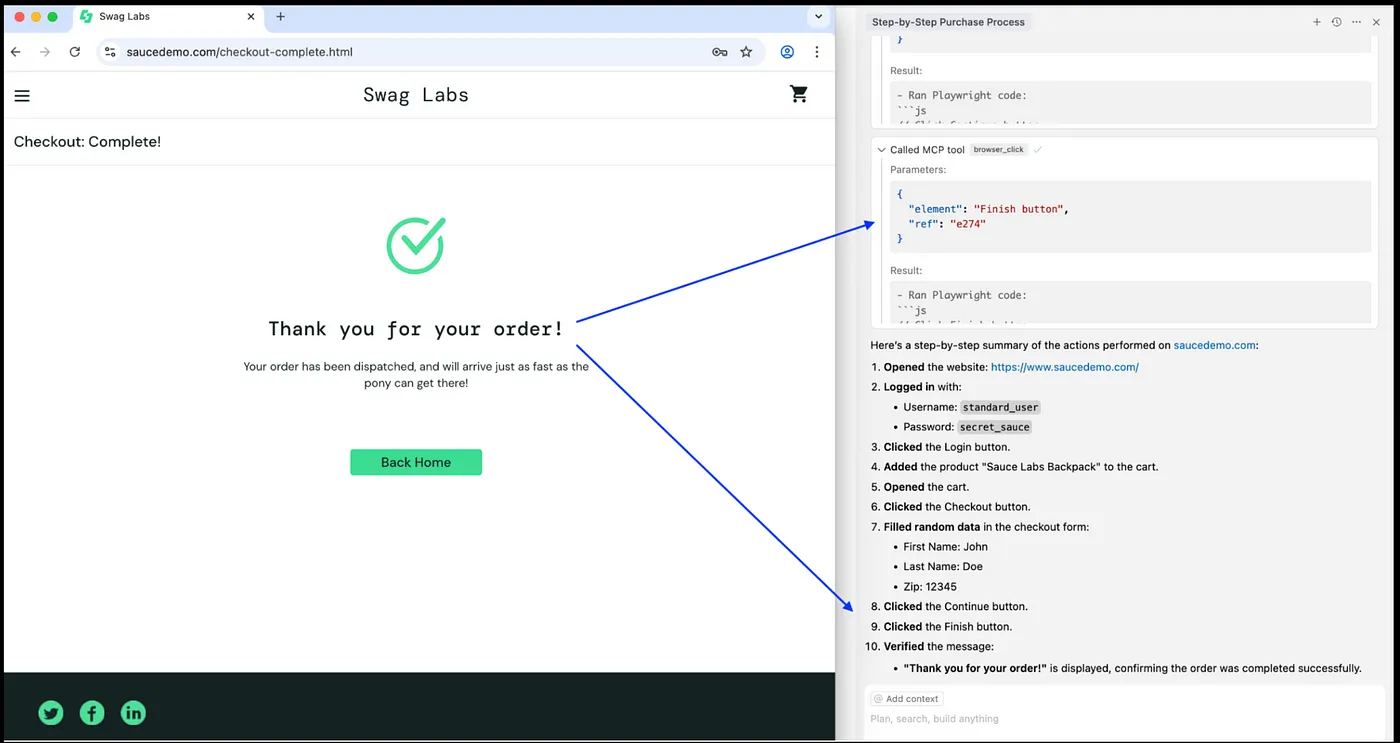
Let's take the following example of logging in and placing the order with the help of Cursor.
Open @https://www.saucedemo.com/.
Login with Username and password.
Click On Login button.
Add Product "Sauce Labs Backpack" into the cart.
Open the cart.
Click on Checkout button.
Fill Random data in First name, last name and Zip.
Click on continue button.
Click on finish button.
Verify message "Thank you for your order!"
In the screenshot below, you can see the instructions to execute.
All the given instructions are executed one by one.
Note: We have to click on “Run tool” to execute the commands.
Finally, in the screenshot below, you can see that all steps are executed successfully, and the message “Thank you for your order!” is verified.
Conclusion
As software development cycles become increasingly rapid and complex, the need for smarter, more resilient test automation grows. The fusion of Generative AI and Playwright MCP marks a pivotal step forward, enabling teams to automate with greater speed, precision, and adaptability. By minimizing maintenance overhead and intelligently handling dynamic interfaces, this powerful combination not only enhances test coverage but also frees up QA professionals to focus on high-value, strategic activities.
However, as with any AI-driven solution, it’s crucial to evaluate and implement these technologies with a strong focus on security and data privacy. Ensure sensitive test data is protected, model behavior is well-understood, and integrations follow your organization’s security standards.
Opinions expressed by DZone contributors are their own.
Comments